All Archives - Page 4 Of 11 - America's Advantage Remodeling

All

Dining Nook Design Done Right: What This Land Park Remodel Got Right in a Small Corner
Опубликовано: September 15, 2026 в 8:27 am

Автор:

Категории: All

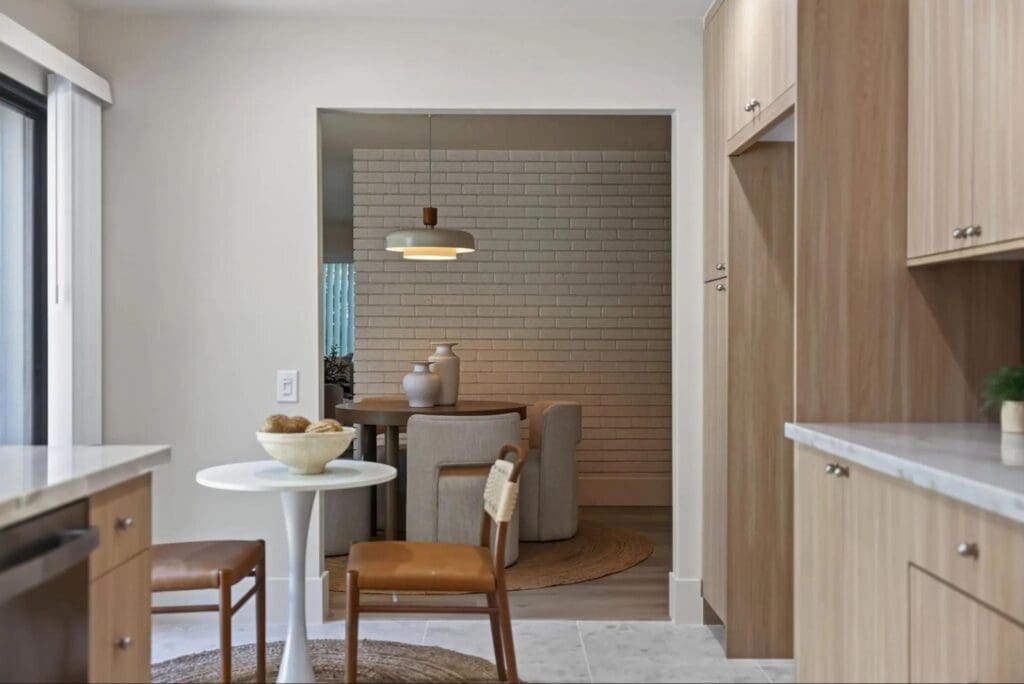
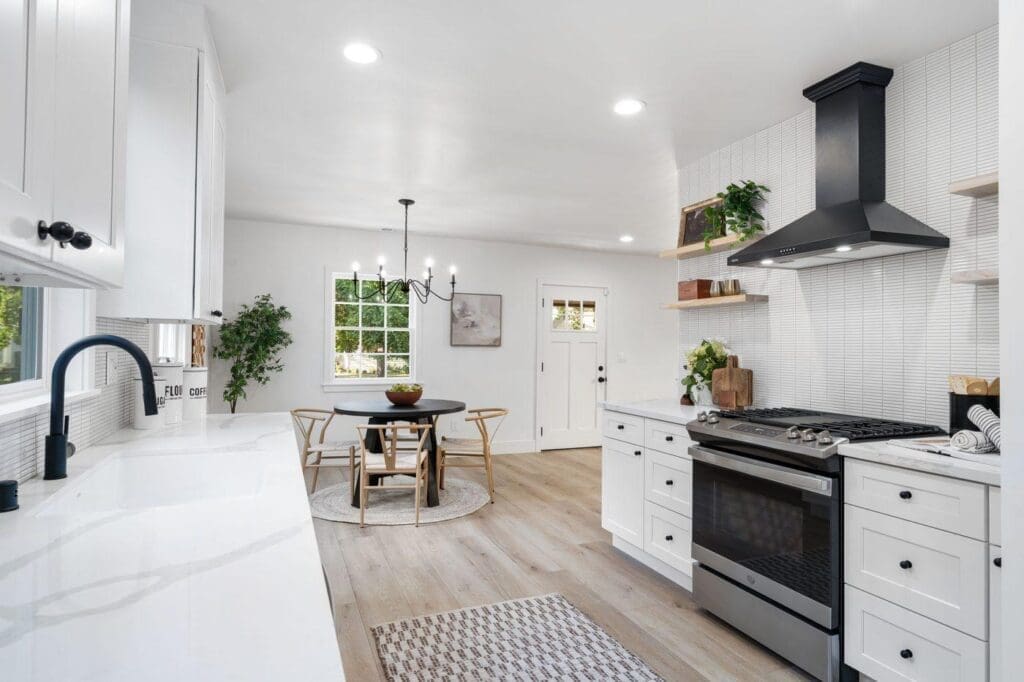
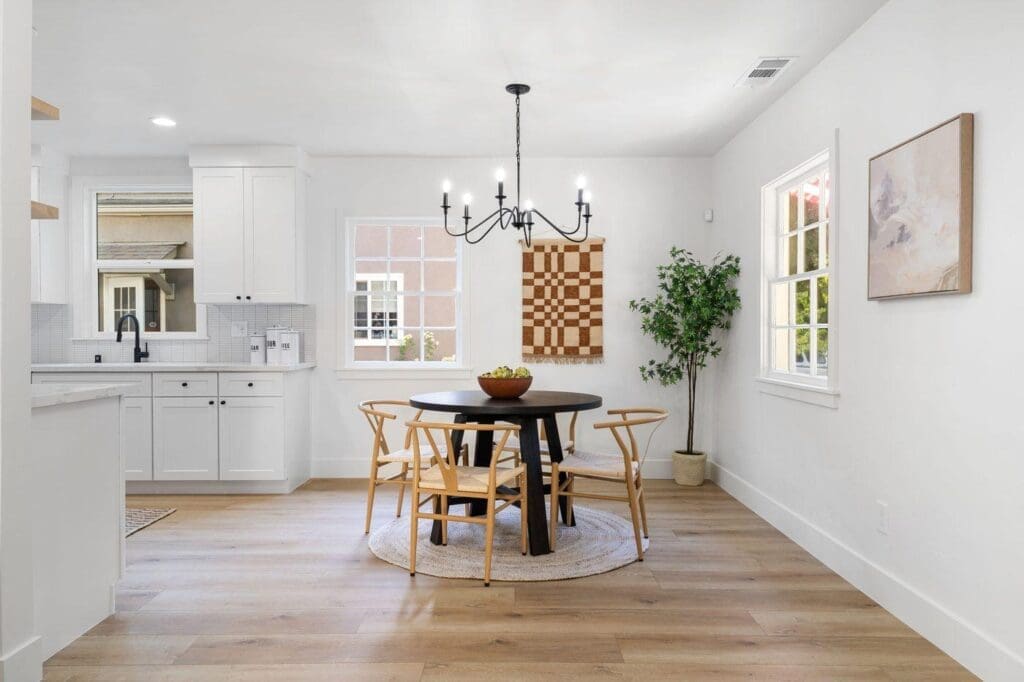
Walk to the far side of the kitchen in this recent Land Park remodel, and the dining nook is already in view, a round black table and a black chandelier framed past the range hood and floating shelves, pulling your eye straight through the open-concept layout. That sightline is no accident. Not every kitchen remodel needs a full, separately furnished dining room; sometimes the better answer is a well-placed corner that does the job just as well, and stays visible from everywhere else in the room. It’s a small space, but it does a lot of work. Here’s what made it come together.
More Than a Table in a Corner

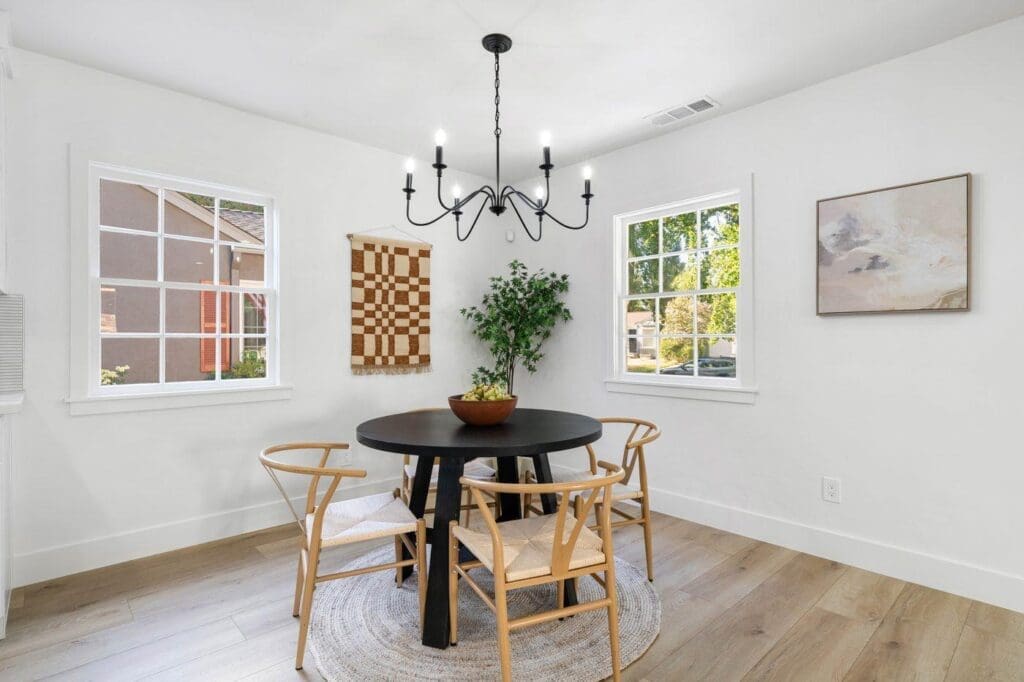
The furniture here is doing real design work, not just filling space: a round black table with no sharp corners to navigate around, wishbone chairs in natural wood with woven seats to keep the look from feeling too heavy, and a black wrought-iron chandelier overhead that echoes the table’s finish. A woven checkerboard textile on the wall and a potted tree add texture without competing with the furniture. None of it is expensive or hard to source, it’s a considered pairing, not a custom build, which is exactly why it’s easy to replicate.
Open to the Kitchen, Not Closed Off From It

The nook sits at the edge of the kitchen with no wall separating the two spaces, just a change in flooring pattern and a round jute rug to visually anchor the table. That’s the real difference between a dining nook and a dining room: the nook doesn’t pretend to be a separate room. Whoever’s cooking can talk to whoever’s at the table, and the chandelier’s light reaches just far enough to define the dining zone without needing a wall to do it. That’s the same open sightline that makes the nook visible from clear across the kitchen in the first place.
Ready to Rethink Your Own Kitchen or Dining Layout?

A dining nook is one of those details that works best when it’s planned alongside the kitchen, not added as an afterthought once the bigger layout decisions are already locked in. At America’s Advantage Remodeling, we’ve been designing kitchens and living spaces in the greater Sacramento area since 2001, and we’re happy to walk through your space with you and figure out whether a dining nook or a more traditional dining room fits how your household actually eats and gathers. Reach out for a free in-home consultation.

Frequently Asked Questions

Q: What is a dining nook, and how is it different from a dining room?

A: A dining nook is a smaller, more casual dining space, usually a table and a few chairs tucked into a corner or bay of windows near the kitchen, rather than a separate, formally furnished dining room. It typically shares open sightlines with the kitchen and living space instead of being closed off, which makes it feel like part of the everyday flow of the house rather than a room reserved for special occasions.

Q: Can a dining nook replace a full dining room?

A: For a lot of households, yes, a well-placed dining nook with a table that seats 4 to 6 handles daily meals and casual entertaining just as well as a formal dining room, especially in a home that already has an open-concept kitchen and living area. A separate formal dining room still makes sense for households that regularly host larger sit-down gatherings, but it’s no longer a given that every remodel needs one.

Q: Where should a dining nook be placed relative to the kitchen?

A: A dining nook works best directly adjacent to the kitchen, ideally within a few steps of the stove and sink, so food and dishes don’t have to travel far. Placing it near a window or a corner with natural light also helps it feel like its own defined space even when it’s fully open to the kitchen and living room around it.

Q: Do I need a built-in banquette for a dining nook, or does a regular table work?

A: A built-in banquette isn’t required; a freestanding table and chairs work perfectly well in a dining nook and are easier to reconfigure or replace later than a built-in bench. A banquette makes sense when floor space is especially tight, and the built-in seating can save a few extra square feet, but it’s a space-saving choice, not a requirement for the nook to function.

Q: What makes a small dining nook feel bigger than it is?

A: Windows on two sides of a small dining nook make the biggest difference, since natural light and a view out make the space feel open even at a compact footprint. A round table also helps in a tight nook, since it has no sharp corners to navigate around, and keeping the space visually open to the adjoining kitchen and living room (rather than walling it off) keeps it from feeling boxed in.

Q: How big of a table fits in a dining nook?

A: Most dining nooks comfortably fit a round or oval table seating 4 to 6, roughly 42 to 54 inches in diameter, depending on the corner’s exact dimensions and how much clearance is needed for chairs to slide out. Measuring the available floor space (including at least 36 inches of clearance behind each chair) before choosing a table size prevents the nook from feeling cramped once it’s furnished.
Two Different Mirrors, One Vanity: Why This Sacramento Primary Bath Skips the Matching Pair

Опубликовано: September 11, 2026 в 2:08 pm

Автор:

Категории: Bathroom,All

Most double-vanity bathrooms get two matching mirrors — same size, same frame, mounted at the same height on either side of the counter. It’s the safe choice, and it’s why so many primary bathrooms end up looking like a showroom display. A recent Sacramento-area remodel skipped it: two round, black-framed mirrors in genuinely different sizes, hung over one continuous marble-look vanity. It reads as a deliberate design choice, not a mismatched pair — here’s why it works, and what it takes to pull off in a remodel of your own.

Why Break Up a Matching Pair?

A matching pair of mirrors is the lowest-risk choice because it’s symmetrical by default — order two of the same item, hang them the same height apart, done. But symmetry can also read as flat, especially on a long vanity wall with nothing else breaking it up. Sizing the two mirrors differently does the opposite: it gives the eye something to move across the wall instead of registering it as one repeated shape, while the shared round silhouette and black frame keep the two pieces from feeling like an unrelated pair.

Each Sink Still Gets Its Own Mirror and Light

The functional case for two mirrors over a double vanity doesn’t change just because the sizes differ: each person at the counter still gets a dedicated reflection and, in this bathroom, their own sconce lighting overhead, rather than sharing a single wide mirror spanning both sinks. What changes is proportion, not function — the larger mirror doesn’t do more work than the smaller one, it just occupies more of the wall above its sink, which is a purely visual call tied to the layout of the room, not a functional upgrade.

Is This a Trend Worth Copying?

If a double vanity already has a strong shared element — a continuous quartz or marble-look counter, one consistent cabinet color, matching hardware — two different-sized mirrors are a low-risk way to add visual interest without touching the parts of the room that are more expensive to change. It’s a much smaller decision than picking a countertop or cabinet finish, and it’s easy to plan for during a bathroom remodel since it only affects two wall-mounted fixtures. The one thing to get right is the shared element between the two mirrors — frame color, shape, or finish — since that’s what tells a visitor’s eye it’s a design choice and not two different orders that happened to arrive.

For comparison, here’s the secondary bathroom in the same home — a single sink, single vanity, and one round black-framed mirror. There’s nothing wrong with this version; it’s the standard approach, and it’s the right call on a smaller vanity with only one sink to serve. The mismatched pair only makes sense once there are two sinks and two people sharing the counter — on a single-sink vanity like this one, a second mirror would just be two mirrors doing one job.

Frequently Asked Questions

Q: Do mirrors over a double vanity have to match?

A: No — matching mirrors are the default because they’re the easiest choice, not because they’re required. A double vanity works just as well with two different mirrors, as long as they share a common element like frame color, shape, or finish so the pairing reads as intentional rather than mismatched by accident.

Q: Why would a remodel use two different-sized mirrors instead of one large mirror?

A: Two individual mirrors give each person at the vanity their own dedicated reflection and task lighting zone, which a single wide mirror spanning both sinks doesn’t do as cleanly. Varying the sizes on top of that adds visual interest to a wall that would otherwise be a flat, symmetrical repeat, without giving up the practical benefit of one mirror per sink.

Q: How do you choose mirror sizes for a double vanity?

A: Start with a size that comfortably covers each person’s sightline while standing at their sink — generally two-thirds to three-quarters of the vanity mirror’s practical width per side — then let the ceiling height and any nearby windows or art drive how much you scale one mirror up or down relative to the other. The goal is a size difference that reads as a clear, deliberate choice, not a near-miss that looks like two different orders arrived.

Q: Does mismatched mirror sizing cost more than a matching pair?

A: Not meaningfully — two mirrors in different sizes typically cost about the same as two matching mirrors of similar quality, since pricing is driven mostly by size, frame material, and finish rather than whether the pair matches. The only added cost risk is ordering from two different lines that don’t share a consistent frame finish, which can make the size difference look unintentional instead of designed.

Q: Does each mirror need its own light fixture?

A: It’s the more common approach and the one most double vanities are wired for, since each sink typically gets its own sconce or vanity bar overhead. Different-sized mirrors don’t complicate this — light fixtures are mounted relative to each sink and mirror individually, so the size difference between the two mirrors doesn’t require any special electrical planning.

Q: Is this look better suited to a primary bathroom or a secondary bathroom?

A: It works in either, but it shows up most often in primary bathrooms because that’s where double vanities are most common and where each person is more likely to want their own distinct space at the counter. In a secondary or guest bathroom with a single vanity, there’s usually only one mirror to plan around, so the choice doesn’t apply the same way.

The Wall-Mounted Pot Filler: Why More Meadowview Kitchen Remodels Are Built Around a Custom Range Hood

Опубликовано: September 11, 2026 в 2:04 pm

Автор:

Категории: All,Kitchen

A standard range hood does one job: pull smoke and steam out of the kitchen. On a recent Sacramento-area kitchen remodel, the hood above the range was asked to do a second job too: anchor the entire cooking wall as a genuine architectural feature, curved and framed in plaster like something out of an old farmhouse, with a wall-mounted brass pot filler built directly into the arch above the cooktop. It’s a detail that photographs beautifully, but it’s also a genuinely useful one. Here’s how the two pieces work together, and what it takes to plan them into a remodel of your own.

A Range Hood Built as an Architectural Feature

Instead of a flat stainless steel box mounted flush to the wall, this hood is framed in curved plaster that arches down and out over the cooktop, finished in the same white as the surrounding cabinetry so it reads as part of the room’s architecture rather than an appliance bolted on afterward. That kind of custom surround takes more planning than a standard hood; the framing has to be built out before the drywall and plaster go in, and the venting still has to be sized correctly underneath the finished shape. Still, the payoff is a cooking wall that looks intentional and finished, not just functional.

The Pot Filler: Function Built Into the Design

Set into the plaster arch directly above the cooktop, the wall-mounted pot filler folds flat against the wall when it isn’t needed and swings out to fill a stockpot without ever lifting a full pot of water across the kitchen. Getting it there means running a dedicated water line up through the wall before it’s closed up, simple to plan during a full remodel, expensive and messy to retrofit into a finished kitchen later. Positioned inside the same arch as the hood, it reads as one continuous feature rather than a separate fixture stuck onto the backsplash.

Is a Pot Filler Worth Adding to Your Kitchen Remodel?

For a household that cooks large pots of pasta, stock, or soup regularly, a pot filler earns its keep quickly; it’s a small daily convenience that’s cheap to add while a wall is already open during a remodel and genuinely disruptive to add afterward. For a kitchen that rarely sees a stockpot, it’s a harder feature to justify purely on function, though even then, many homeowners choose to add one simply because it fills the wall space above the range with an intentional detail instead of leaving it bare. Either way, it’s worth deciding early, before the plumbing rough-in and the hood framing are finalized.

Planning a Kitchen Remodel of Your Own?

A custom range hood and a wall-mounted pot filler are exactly the kind of details that are simple to build in when a kitchen’s walls, plumbing, and cabinetry are already being planned from scratch, and difficult and expensive to add once everything is finished. At America’s Advantage Remodeling, we’ve been designing and building kitchens in the greater Sacramento area since 2001, and we’re happy to walk through your space with you and figure out which details are worth building in for how you actually cook and live. Reach out for a free in-home consultation.
Frequently Asked Questions

Q: What is a pot filler and do I need one in a kitchen remodel?

A: A pot filler is a dedicated faucet mounted on the wall directly above a cooktop or range, designed to fill large pots with water right where they’ll be used instead of carrying a full pot over from the sink. It’s not a necessity; most kitchens function fine without one, but for anyone who regularly cooks pasta, stockpots, or large batches of food, it removes a genuinely awkward, heavy step from the process.

Q: How much does it cost to add a pot filler to a kitchen remodel?

A: Because a pot filler needs its own hot or cold water line run up through the wall to the cooktop, the plumbing work, not the faucet itself, is what drives the cost, and it’s dramatically cheaper to rough that line in during a full remodel than to open a finished wall for it afterward. Homeowners should expect the fixture itself, the added plumbing, and any wall or backsplash work around it to be priced as part of the overall kitchen plumbing scope, not as a simple add-on faucet swap.

Q: Where should a pot filler be installed above the range?

A: Pot fillers are typically mounted 24 to 26 inches above the cooktop surface, high enough to swing a stockpot underneath without the faucet arm hitting the pot’s rim, and centered over the burners the pot is most likely to sit on. On a range with a hood or backsplash niche above it, the pot filler is usually built into that same feature wall so it reads as one continuous design element rather than a faucet stuck onto plain tile.

Q: Does a pot filler need special plumbing?

A: Yes, a pot filler needs its own dedicated water line run to the wall above the range, which almost always means opening the wall (or planning for it before the wall is closed up during a remodel) since that plumbing doesn’t already exist near most cooktops. It doesn’t need a drain, since it only dispenses water, which keeps the plumbing work simpler than adding a full second sink.

Q: What is a custom range hood and why choose one over a standard hood?

A: A custom range hood is built and finished to match the surrounding cabinetry and architecture of the kitchen, often framed in plaster, wood, or an arched surround, rather than installed as a standalone stainless steel unit sitting on the wall. Homeowners choose custom hoods when they want the venting equipment to double as a design feature, anchoring the whole cooking wall the way a fireplace mantel anchors a living room.

Q: Is a pot filler just a design feature, or is it actually useful?

A: It’s genuinely both, a pot filler saves real effort for anyone who cooks large pots of water regularly, and it also fills the wall space above the range with an intentional detail instead of leaving it bare. Even homeowners who end up using it only occasionally tend to say the convenience is worth it on the days they do, since it’s a small feature to build in during a remodel but a difficult one to add later.

Backlit Anti-Fog Mirrors: The Small Upgrade Making a Big Difference in Freeport Manor Bathroom Remodels

Опубликовано: September 11, 2026 в 1:59 pm

Автор:

Категории: Bathroom,All

“Is it actually possible to get a mirror that doesn’t fog up after every shower?” is a question that comes up more often than you’d expect during a bathroom remodel, usually from someone who’s spent years wiping condensation off the glass with a towel before they can finish getting ready. On a recent Freeport Manor bathroom remodel, the answer turned out to be a single fixture: a backlit, anti-fog LED mirror that replaced both the old mirror and the vanity light in one install. Here’s a close look at what it actually does, and where it fits into a remodel.

More Than a Mirror: LED Light, a Defogger, and a Clock

This isn’t a mirror with a light added on; it’s a single fixture built around three functions at once. A ring of LED lighting runs around the frame for even, shadow-free light at the vanity, a built-in heating pad behind the glass keeps the surface warm enough that shower steam never condenses on it, and a small digital clock is set right into the glass itself, visible even when the mirror’s other lighting is off. Homeowners choosing this kind of upgrade during a remodel are typically replacing a plain builder-grade mirror and a separate vanity light fixture with this one piece, fewer things to buy, fewer things to wire, and one clean look on the wall.

Built Into a Double Vanity, Not Bolted On As an Afterthought

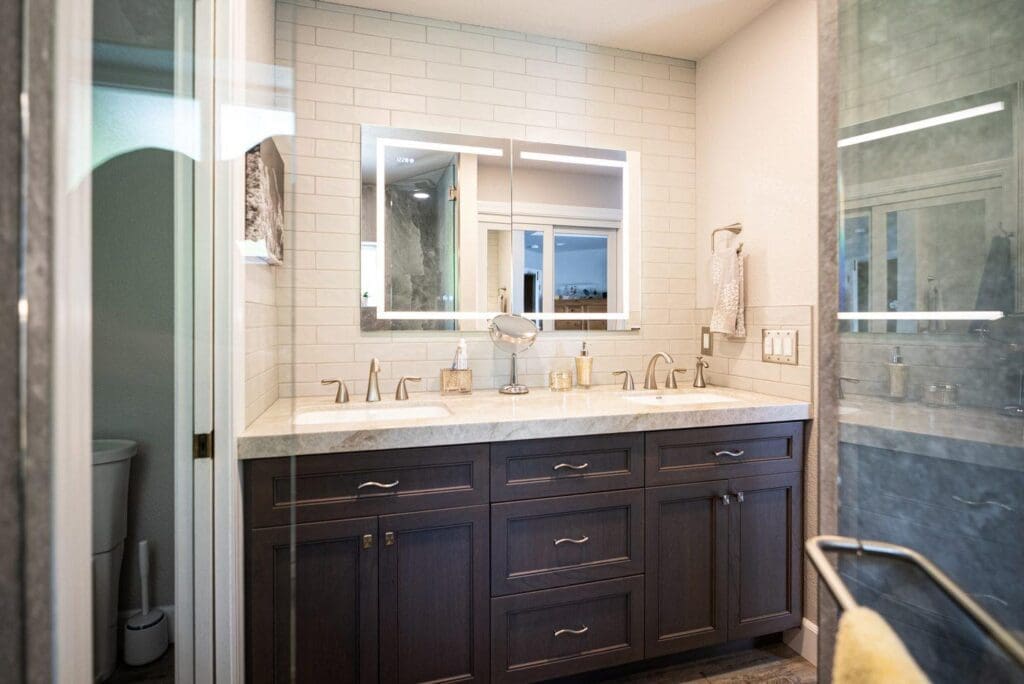
Pulled back to the full vanity, it’s clear this mirror was sized and centered as part of the room’s plan from the start, not squeezed in after the cabinetry was already set. It spans most of the width of a dark wood double-vanity cabinet topped in a marble-look quartz counter, backed by floor-to-ceiling white subway tile that keeps the reflected light bouncing evenly around the room instead of getting swallowed by a darker backsplash. For a bathroom shared by two people getting ready at once, that full-width sizing matters just as much as the lighting technology behind it.

The Everyday Test: Two Sinks, One Mirror, No Fighting Over the Light

A mirror upgrade like this earns its keep in the small, daily details; here, dual undermount sinks and brushed nickel faucets sit under one continuous mirror rather than two separate ones, so there’s no dim spot in the middle where the light doesn’t reach. A small round magnifying mirror on a chrome stand still has its place on the counter for close-up tasks, but it’s a supplement to the backlit mirror’s lighting now, not the only good light source in the room the way it might be with a plain flat mirror and a single overhead can light.

Ready to Upgrade Your Bathroom Mirror?

A backlit, anti-fog mirror is a small line item on a remodel budget with an outsized effect on how a bathroom actually feels to use every morning. At America’s Advantage Remodeling, we’ve been doing this kind of work in the greater Sacramento area since 2001, and we’re happy to walk through your bathroom with you and figure out whether a mirror upgrade or a larger remodel makes sense for your space. Reach out for a free in-home consultation.

Frequently Asked Questions

Q: What is an anti-fog bathroom mirror and how does it work?

A: An anti-fog bathroom mirror uses a thin heating pad built into the back of the glass to keep the surface a few degrees warmer than the surrounding air, which stops shower steam from condensing on it. Most models pair that defogger with an LED light ring built around or behind the mirror, so the anti-fog function and the lighting come from the same fixture rather than two separate installs.

Q: Are LED backlit mirrors worth the extra cost in a bathroom remodel?

A: For a primary or shared bathroom that gets daily use, most homeowners find the extra cost worth it, since a backlit anti-fog mirror replaces two things people often buy separately anyway, a mirror and a vanity light, while adding a defogger neither of those covers on its own. It matters less in a low-traffic guest bathroom, where a standard mirror and light fixture still get the job done.

Q: Can you install a smart mirror during a remodel without rewiring the whole bathroom?

A: In most cases, yes! A backlit mirror needs power at the mirror location, which is a simple add if the wall is already open during a remodel, and many models run off a standard outlet or a junction box rather than a dedicated circuit. It only becomes a bigger electrical job if the bathroom’s existing wiring can’t support the mirror’s lighting draw or if it’s being installed into a wall that isn’t already being opened up.

Q: Do anti-fog mirrors need to stay plugged in all the time to work?

A: The defogger pad and LED lighting only draw power when they’re switched on, so there’s no real cost or wear from leaving the mirror wired in; most homeowners just turn the defogger on a few minutes before a shower and let it run through it. Some models include a timer or auto-shutoff so the defogger doesn’t stay on longer than needed.

Q: What size mirror works best over a double vanity?

A: A double vanity generally looks and functions best with either one wide mirror spanning most of the counter or two mirrors centered over each sink, sized so there’s roughly equal wall space showing on both ends. A mirror that’s noticeably narrower than the vanity below it tends to look undersized once the room is finished. Backlit mirrors are available in both single wide-format and matched-pair sizing, so the choice comes down to the vanity’s width and personal preference more than any technical limit.
Q: Does a backlit mirror still make sense in a bathroom with good natural light?

A: Yes, natural light rarely lines up with when the bathroom actually gets used, especially for early-morning or evening routines, so a backlit mirror still provides even, shadow-free light for tasks like shaving or applying makeup regardless of the time of day. The anti-fog function is also independent of how much daylight the room gets, since it responds to shower steam, not ambient light.

Dual Shower Heads: Why More Pocket-Greenhaven Bathroom Remodels Are Combining Rain and Handheld in One Fixture

Опубликовано: September 7, 2026 в 11:13 am

Автор:

Категории: All

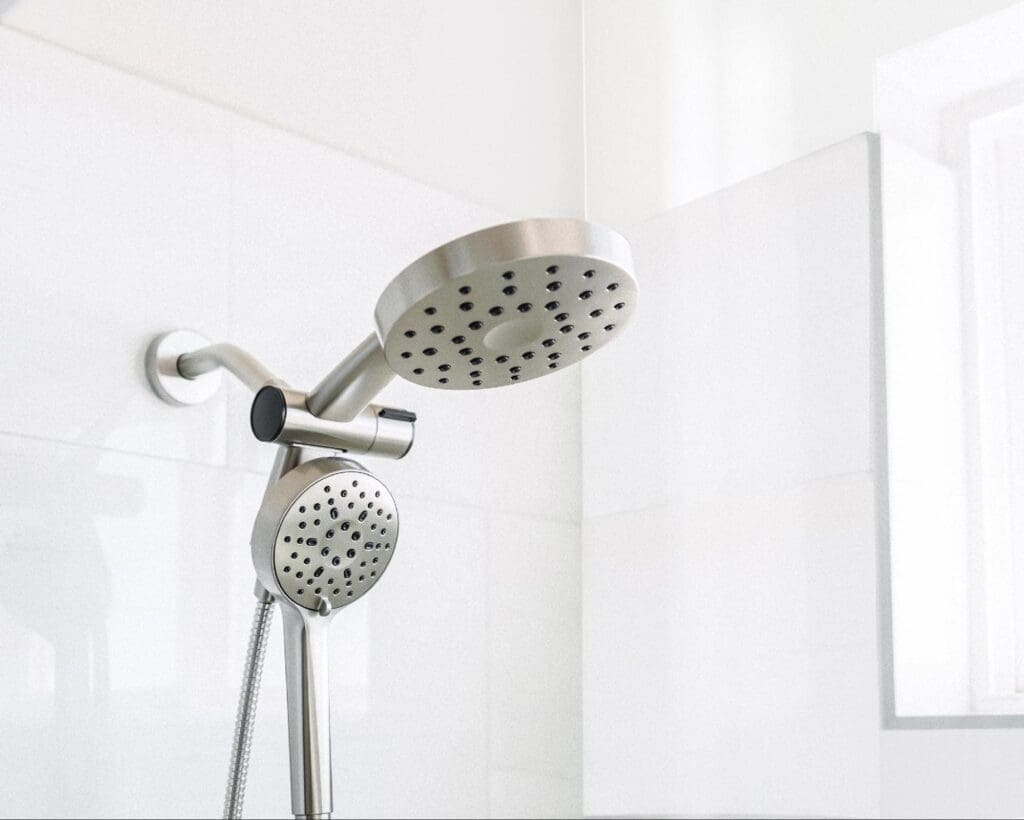
One of the smaller upgrades we get asked about most in a bathroom remodel is also one of the easiest to get wrong: the shower head. Homeowners often assume it’s a choice between a fixed rain head or a handheld wand, when a combo fixture gives you both without adding a second valve or reworking the plumbing. On a recent Pocket-Greenhaven bathroom remodel, that’s exactly what we installed. Here’s a close look at how it works and what to consider before adding one to your own shower.

One Fixture, Two Ways to Shower

This combo unit mounts a fixed rain-style head at the top of the arm and a slide-out handheld wand just below it, both fed from the same shower arm and controlled from a single valve. The rain head handles everyday standing showers with a wide, even spray, while the handheld wand pulls free for rinsing off, washing kids or pets, or cleaning the shower stall itself, all without installing a second water line. It’s a brushed-nickel finish here, a versatile, low-maintenance choice that pairs easily with most vanity and cabinet hardware.

The Controls: One Valve, One Hook

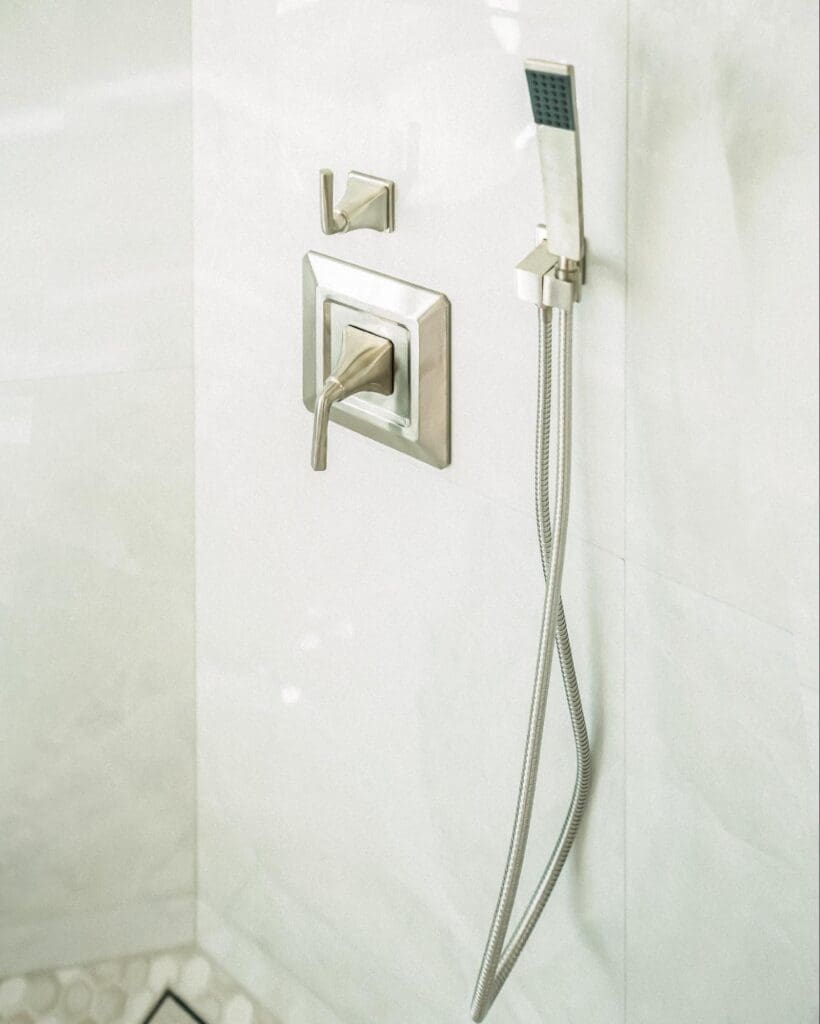
A close-up of the wall controls shows how simply this kind of system integrates into an existing shower: a single lever valve for water flow and temperature, a small diverter above it to switch between the rain head and the handheld wand, and a wall-mounted hook and hose guide to keep the handheld unit stowed when it’s not in use. Because everything routes through the shower’s existing plumbing, retrofitting a combo fixture like this into an older bathroom is usually far simpler than most homeowners expect: no new supply lines, no reworked valve body, just a fixture swap.

Is a Dual Shower Head System Right for Your Bathroom?

A combo rain-and-handheld fixture makes the most sense in a bathroom that gets daily, varied use,  a primary bathroom, a shared kids’ bathroom, or any shower that also needs to double as a place to rinse a dog or clean the stall itself. If your existing shower already has a single functioning arm and valve, adding one is usually a straightforward fixture swap rather than a plumbing project. It’s less necessary in a rarely-used guest bathroom, where a single fixed head still covers the job just fine.

Ready to Upgrade Your Shower Fixtures?

A dual shower head is a small change with an outsized impact on how a bathroom actually functions day to day. At America’s Advantage Remodeling, we’ve been doing this kind of work in the greater Sacramento area since 2001, and we’re happy to walk through your bathroom with you and figure out whether a combo fixture — or a larger remodel — makes sense for your space. Reach out for a free in-home consultation.

Frequently Asked Questions

Q: What is a dual shower head?

A: A dual shower head is a single shower fixture that combines two spray sources on one mount,  typically a fixed rain-style head for standing under and a handheld wand on a slide bar or hose for rinsing, cleaning the shower, or bathing kids and pets, controlled from the same wall-mounted valve.

Q: Is it hard to install a dual shower head system?

A: Installing a dual shower head fixture is usually straightforward if the shower already has a single functioning shower arm and valve, since many combo units simply replace the existing head and add a diverter and handheld cradle. It becomes a bigger job only if the plumbing needs to be opened up to add a second water line or reroute the valve.

Q: Can you use the rain head and handheld shower at the same time?

A: It depends on the specific fixture. Many combo units use a diverter valve that switches between the rain head and the handheld wand rather than running both at once, though some higher-end systems do allow simultaneous use. Check the specific model’s diverter type before assuming both will run together.

Q: What’s the benefit of a handheld shower head over a fixed head alone?

A: A handheld shower head adds flexibility a fixed head can’t match on its own; it’s easier to rinse off standing or seated, clean the shower itself, bathe kids or pets, and direct water exactly where it’s needed, all without changing the plumbing beyond adding the handheld unit and its slide bar or hook.

Q: Does adding a second shower head reduce water pressure?

A: It can, depending on the home’s water pressure and the fixture’s flow rate, since a combo unit is still governed by the same valve and supply line as a single head. Most modern combo units are designed to stay within standard low-flow fixture ratings even when switching between heads, but a home with already-weak pressure may notice more of a difference.

Q: What finish should I choose for shower fixtures?

A: The best finish depends on the rest of the bathroom’s hardware; brushed nickel and chrome are versatile, low-maintenance choices that pair well with most cabinet hardware and faucets, while matte black or brushed gold make more of a style statement but show water spots more visibly. Matching (or intentionally contrasting) the finish already used on the vanity faucet and cabinet hardware usually gives the most cohesive result.

Sunroom or Home Office? How One East Sacramento Remodel Turned Two Unused Rooms into Everyday Living Space

Опубликовано: September 7, 2026 в 11:09 am

Автор:

Категории: All

One of the most overlooked opportunities in a full home remodel isn’t the kitchen or the bathroom; it’s the room nobody quite knows what to do with. On a recent East Sacramento remodel, that meant two spaces: a converted sunroom off the back of the house, and a spare bedroom that became a home office and den. Neither needed an addition or a structural rebuild. Both just needed the right plan for how they’d actually get used. Here’s what that looked like.

The Sunroom: A Brick Half-Wall and a Reason to Sit Down

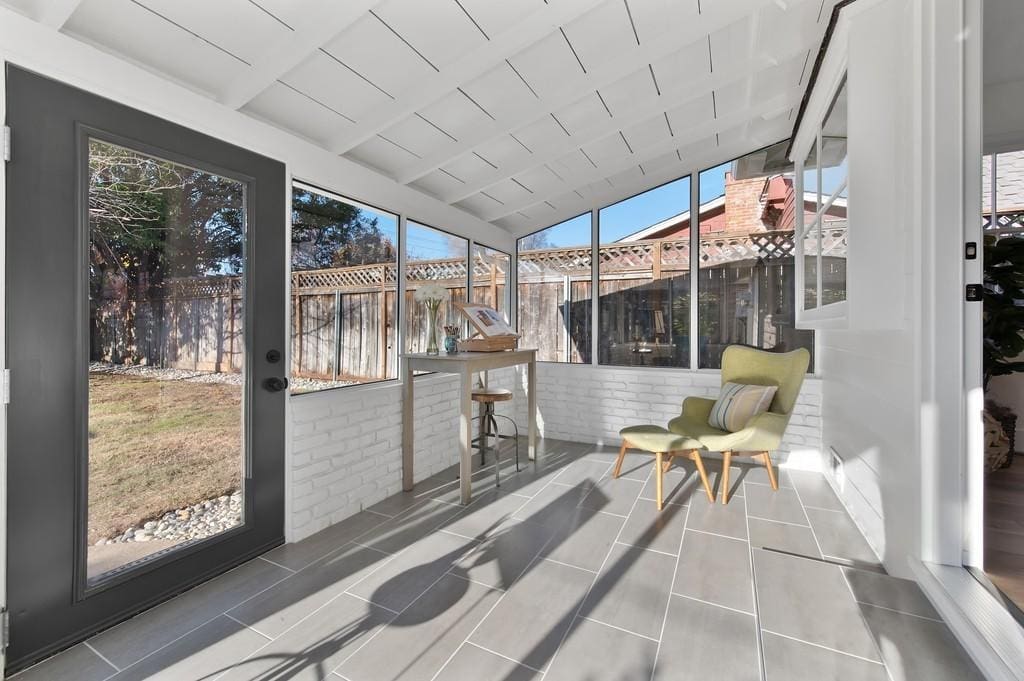
This sunroom sits off the back of the house, wrapped in windows on two sides with a black-framed glass door leading straight out to the yard. A painted white brick half-wall runs beneath the windows, tying the room to the same white-brick treatment used on the home’s living room fireplace, while light engineered-style tile flooring keeps it easy to maintain year-round. Furnished simply, a small round table and stool on one side, an upholstered chair and ottoman on the other, it reads as genuine everyday living space rather than a leftover porch. The kind of natural light a sunroom gets is hard to replicate anywhere else in a house, which is exactly why converting one instead of leaving it as unused overflow space is worth the modest investment.

The Same Sunroom, a Different Job: Creative Overflow Space

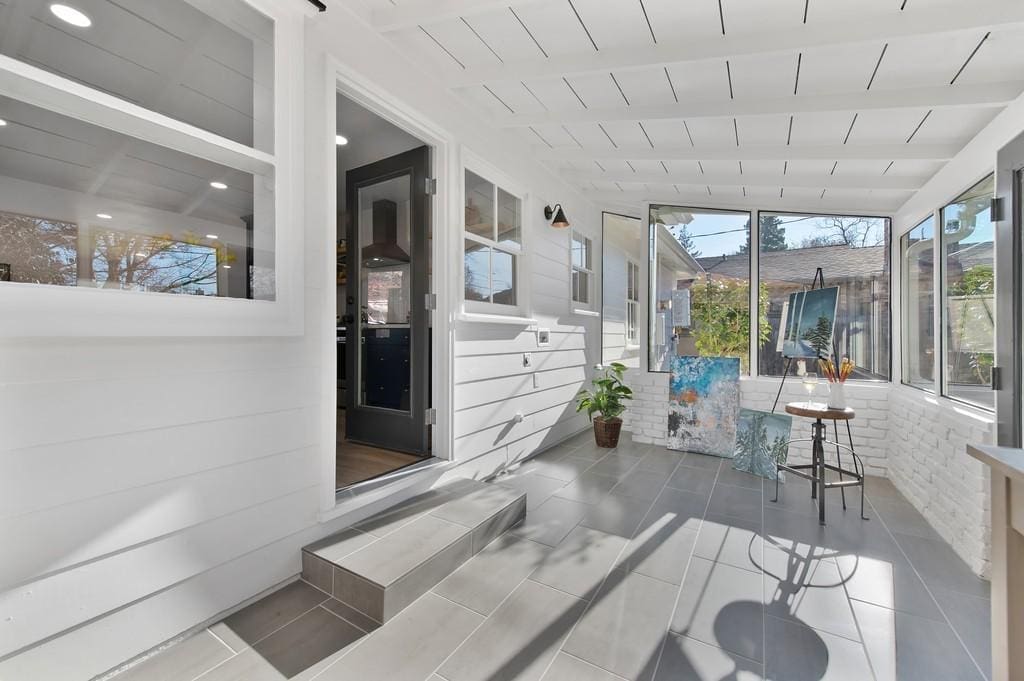
A second view of the same sunroom, closer to the step-down transition from the main house, shows exactly why a converted flex space earns its keep: this corner is doing double duty as a small art and hobby nook, with a couple of canvases leaning against the brick half-wall and a stool-side table holding brushes and pencils. Nothing about the room had to change to support this: the same windows, the same brick half-wall, the same flooring simply flex to whatever the household needs that week. That’s the real argument for a sunroom conversion over leaving the space empty: one room, several jobs, no remodel required to switch between them.

The Home Office: Turning a Spare Bedroom into a Workspace

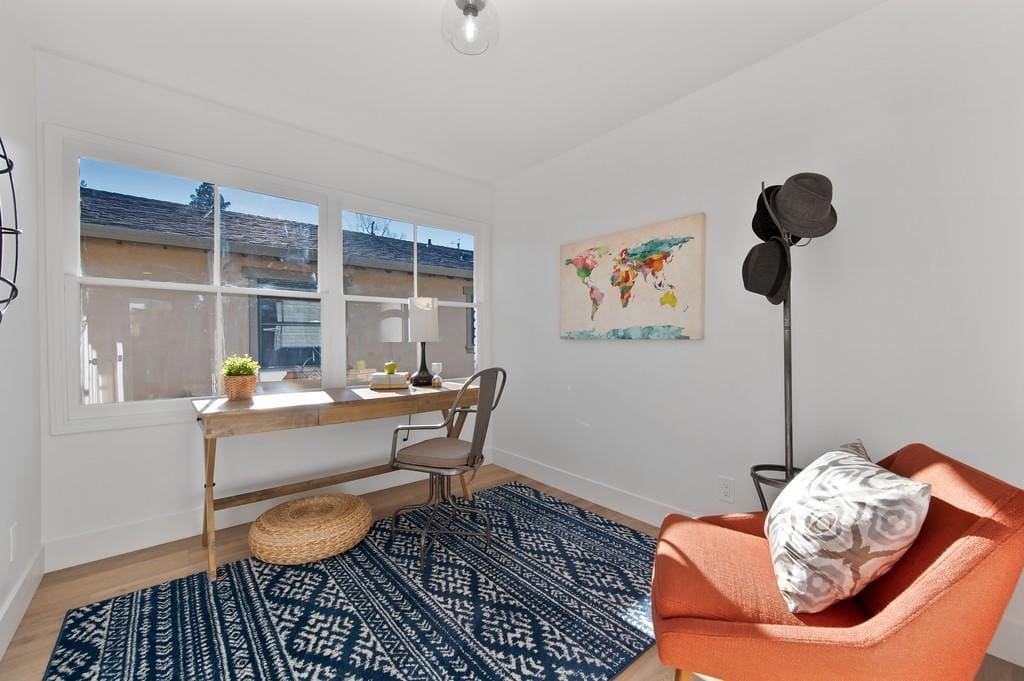
Across the house, a secondary bedroom was converted into a home office and den,  a straightforward change that made the whole home more functional without touching a single wall. A wood desk sits under the window for natural light, paired with a simple wood-frame chair, while a woven ottoman, patterned area rug, and an upholstered accent chair make the room comfortable enough to double as a den, not just a workstation. A coat rack loaded with hats and a framed piece of wall art finish the room off as a genuine everyday space rather than a purely functional one. Since this kind of conversion is almost entirely cosmetic- paint, flooring, lighting, and furniture- it’s one of the most affordable ways to add real function to a full remodel.

Which Unused Room Should You Convert?

The right conversion depends on what the room already has going for it. A room with abundant natural light and a connection to the outdoors,  like a sunroom, porch, or enclosed patio, is the strongest candidate for a flexible living or hobby space, since its main asset (light and view) can’t easily be added elsewhere. A spare bedroom or underused interior room, on the other hand, is the better candidate for a home office or den, since it already has the privacy, wall space, and electrical access a workspace needs. Either way, the goal is the same: match the room’s existing strengths to a specific daily use instead of leaving it as generic, unused square footage.

Ready to Reclaim an Unused Room in Your Home?

Whether it’s a sunroom that’s become a glorified storage spot or a spare bedroom nobody uses, turning that space into something the household actually needs is often one of the more affordable parts of a full home remodel. At America’s Advantage Remodeling, we’ve been doing this kind of work in the greater Sacramento area since 2001, and we’re happy to walk through your home with you and figure out what each unused room could become. Reach out for a free in-home consultation.

Frequently Asked Questions

Q: What’s the difference between a sunroom and a converted den or office?

A: A sunroom is typically an existing three-season or enclosed porch-style space defined by extensive windows and natural light, while a converted den or office is usually a former bedroom or other interior room repurposed with new flooring, paint, and furniture for a specific daily use. Both fall under the same idea,  turning an underused room into a functional living space, but a sunroom leans on its light and view, while a converted den leans on layout and furnishing.

Q: Is a sunroom conversion worth it?

A: Yes, for most homeowners, a sunroom conversion is worth it because it adds genuinely usable square footage without the cost of a full addition. The structure, windows, and roofline are usually already in place, so the work is mostly cosmetic and functional (flooring, paint, furnishing, sometimes insulation) rather than structural.

Q: Do I need a permit to convert a spare bedroom into a home office?

A: Usually not, since converting a bedroom into a home office typically doesn’t change the room’s structure, electrical service, or plumbing; it’s a cosmetic and furnishing change. A permit becomes necessary only if the conversion adds new electrical circuits, moves walls, or adds built-ins that alter the room’s structure, so it’s worth checking with your local building department if the scope grows beyond paint, flooring, and furniture.

Q: How much does it cost to convert a room into a home office?

A: Converting an existing room into a home office is one of the more affordable remodeling projects, since it usually only involves fresh paint, updated flooring, lighting, and furniture rather than any structural work. Costs rise if the room needs a built-in desk nook, additional electrical outlets, or dedicated network wiring.

Q: Can a sunroom be used year-round?

A: It depends on how it’s built. A three-season sunroom with single-pane glass and no insulation will be uncomfortable in extreme heat or cold, but a sunroom finished with insulated windows, proper HVAC connection, and insulated walls, like the brick half-wall construction shown here,  can function as genuine year-round living space.

Q: What’s the best use for an unused bonus room?

A: The best use depends on what the household is missing most: a home office for remote work, a den or reading room for quiet downtime, a playroom for kids, or a hobby/craft space. The strongest conversions match the room’s existing light, layout, and location in the house to a specific daily need rather than furnishing it generically.

Pedestal Sink vs. Floating Vanity: Two Ways to Do a Secondary Bathroom in the Same East Sacramento Remodel

Опубликовано: September 3, 2026 в 12:28 pm

Автор:

Категории: All,Bathroom

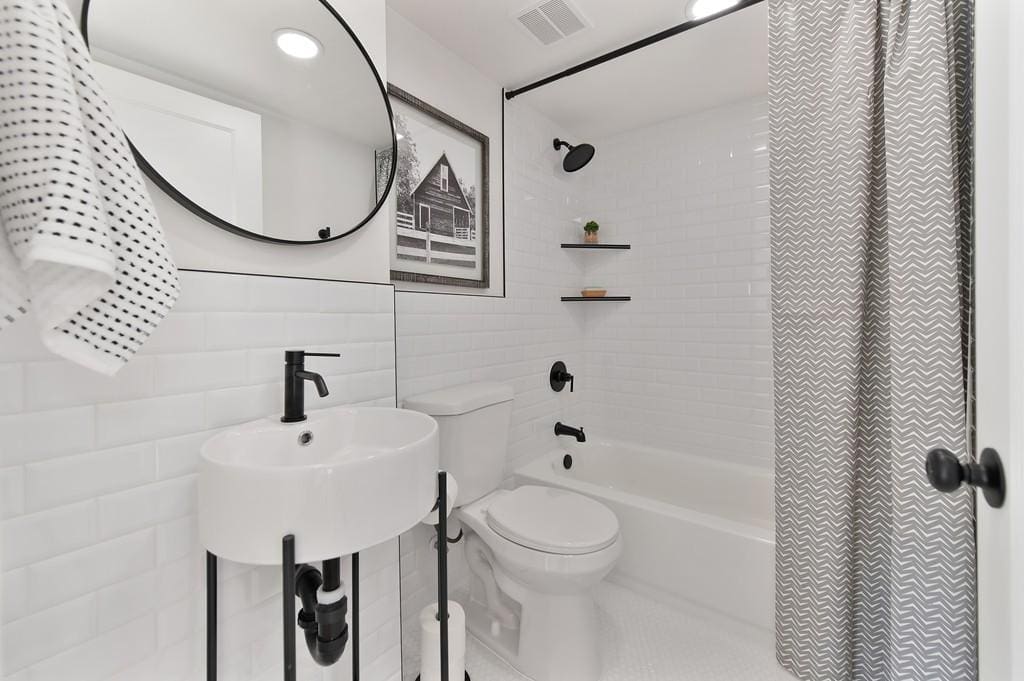
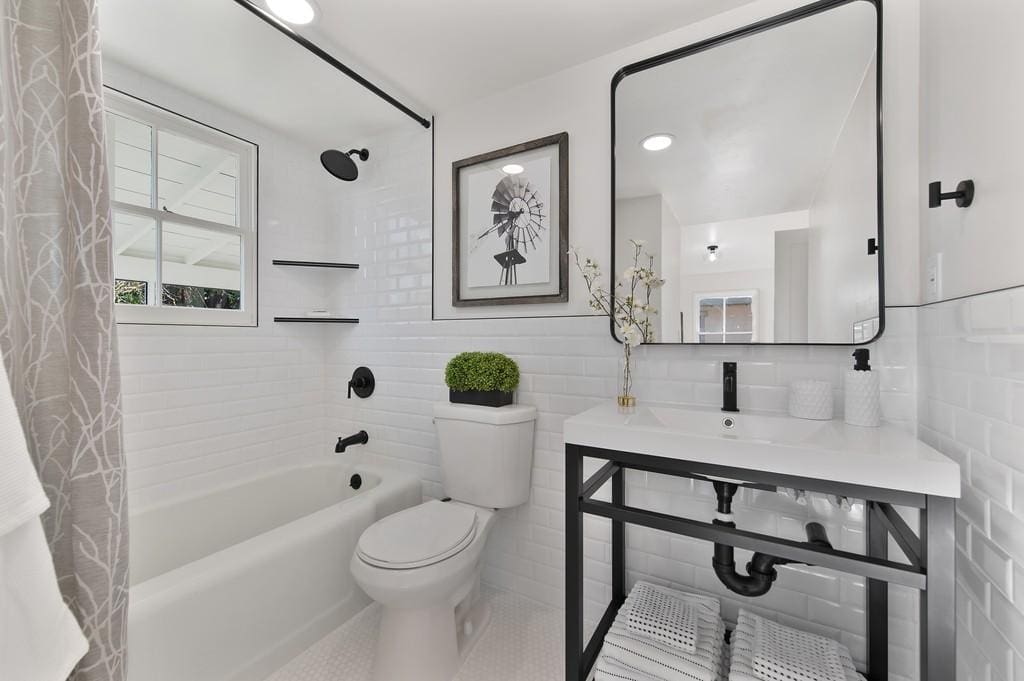
Most bathroom-vanity advice treats it like a single decision: pick a style, move on. But in a full remodel with two secondary bathrooms, that’s really two decisions, and there’s no rule that says they have to match. On a recent East Sacramento remodel, we gave one bathroom a pedestal sink and a round mirror, and the other a floating vanity with a full framed mirror. Same white subway tile, same matte black fixtures, two completely different feels. Here’s how to think about which one is right for your own bathroom.

The Pedestal Sink: Small-Space Simplicity

This secondary bathroom keeps things simple: a pedestal sink on a single slim column, a round mirror above it, and matte black fixtures against floor-to-ceiling white subway tile. With no cabinet base taking up floor space, the room reads more open than its actual square footage, a real advantage in a smaller bathroom where every inch of visible floor matters. The tradeoff is storage: everything that would normally live in a vanity drawer needs another home, whether that’s a linen closet down the hall or a small wall-mounted shelf.

The Floating Vanity: Storage Without the Bulk

The home’s other secondary bathroom takes a different approach: a wall-mounted floating vanity with a large framed mirror, paired with the same white subway tile and matte black fixtures used throughout the house. Because the vanity is mounted to the wall rather than resting on the floor, it keeps most of the visual lightness of a pedestal sink while adding real drawer storage underneath; towels, toiletries, and everyday items all get a home instead of competing for counter space. This particular bathroom also happens to open directly off the primary bedroom, which is exactly why the extra storage earns its keep: a bathroom used every single day by the same person benefits from having somewhere to put things close at hand.

A Third Option: The Double Vanity

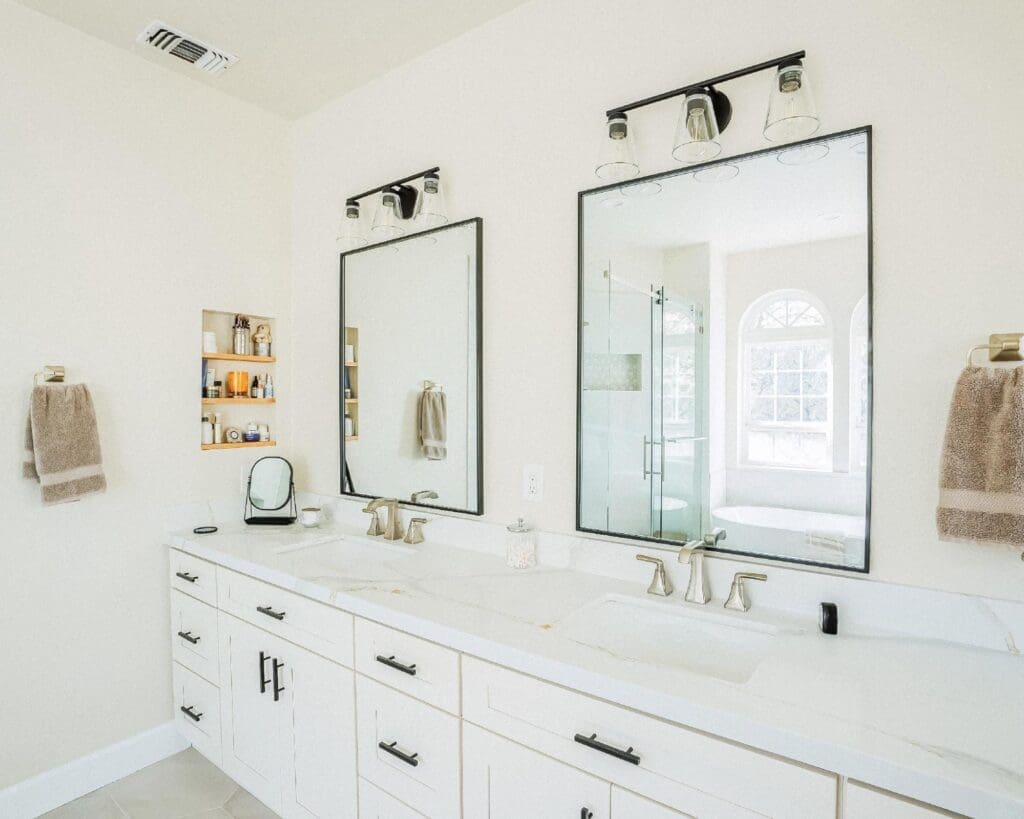
Pedestal sink and floating vanity aren’t the only ways to handle a bathroom sink; if two people share a bathroom every morning, a double vanity solves the storage-and-space problem in a different way entirely. This example comes from a separate AAR bathroom remodel in El Dorado Hills, shown here for comparison rather than from the East Sacramento project featured above: two full sink stations, each with its own framed mirror and sconce lighting, plus a built-in shelf niche for everyday toiletries. It’s worth considering any time more than one person needs the sink at the same time.

Which One Fits Your Bathroom?

As a rule of thumb: reach for a pedestal sink in a true powder room or a small secondary bathroom that guests use occasionally, where storage isn’t doing much daily work and openness matters more. Reach for a floating vanity in any bathroom used daily, a primary ensuite, a kids’ bathroom, or a secondary bath that pulls double duty, where the extra drawer storage earns its keep. And reach for a double vanity specifically when two people need the sink at the same time, whether that’s a primary suite or a shared kids’ bathroom. There’s more nuance to picking a vanity style than just these three options; see our broader roundup of bathroom vanity ideas for other directions to consider.

Ready to Update Your Bathroom Vanity?

Whether you’re leaning toward the open simplicity of a pedestal sink or the everyday practicality of a floating vanity, the right choice comes down to how that specific bathroom gets used, not a single house-wide style rule. At America’s Advantage Remodeling, we’ve been doing this kind of work in the greater Sacramento area since 2001, and we’re happy to walk through your bathrooms with you and figure out what fits each one best. Reach out for a free in-home consultation.

Frequently Asked Questions

Q: What’s the difference between a pedestal sink and a floating vanity?

A: A pedestal sink is a wall-mounted or floor-standing sink with a single slim support column and no storage underneath, while a floating vanity is a wall-mounted cabinet with drawers or shelves below the sink. Pedestal sinks read as more minimal and open; floating vanities give up a little of that openness in exchange for real, built-in storage.

Q: Which is better for a small bathroom?

A: Both work well in a small bathroom, just for different reasons. A pedestal sink keeps the floor visible underneath it, which can make a tight room feel less cramped, while a floating vanity still reads as light and open, since it’s wall-mounted, not floor-standing, and adds storage a pedestal sink can’t. If storage is tight elsewhere in the house, the floating vanity is usually the better trade.

Q: Can I add storage to a bathroom with a pedestal sink?

A: Yes. A pedestal sink bathroom can still get storage nearby; a linen cabinet, wall-mounted open shelving, or an over-the-toilet cabinet all work well; it just won’t be built directly into the sink base the way a vanity’s drawers are.

Q: How much does it cost to switch from a pedestal sink to a vanity?

A: Swapping a pedestal sink for a vanity during a bathroom remodel typically adds a modest amount on top of the sink and faucet swap itself, mainly for the cabinetry and any plumbing rework needed to route supply and drain lines behind a closed cabinet instead of exposed under a pedestal. The exact cost depends heavily on the vanity’s size and material.

Q: Do all the bathrooms in a home need to match in style?

A: No. There’s no requirement that every bathroom in a home use the same fixtures or vanity style. Many remodels intentionally vary the approach room to room, matching each bathroom’s size, use, and storage needs instead of forcing one design across the whole house, which is exactly what happened in the project featured here.

Q: What is a floating vanity, exactly?

A: A floating vanity is a bathroom vanity cabinet mounted directly to the wall rather than resting on the floor, leaving a visible gap underneath. It gives you drawer or shelf storage like a traditional vanity while still keeping the room feeling open, a common middle ground between a bulky floor-standing vanity and a storage-free pedestal sink.

Q: What if two people need to use the bathroom sink at the same time?

A: A double vanity is the best solution when two people regularly need sink access at once, such as a shared primary suite or a kids’ bathroom. It gives each person their own sink, mirror, and counter space, avoiding the daily bottleneck a single sink creates, at the cost of more floor space and plumbing than a single pedestal sink or floating vanity needs.

Butler’s Pantry Coffee Bar: Why More Land Park Homeowners Are Adding a Built-In Espresso Station

Опубликовано: September 3, 2026 в 12:23 pm

Автор:

Категории: All

I’m Eugene Chernioglo, and “do we really need a whole extra room just for coffee?” is a question I get more and more as kitchen remodels get bigger and more zoned. On a recent kitchen remodel near Land Park, we built a full butler’s pantry off the main kitchen with a dedicated espresso and coffee station, no counter space sacrificed, no morning traffic jam at the main sink. Here’s what went into it, what it costs, and how to think about adding one to your own kitchen.

Open Shelving Ties It Together

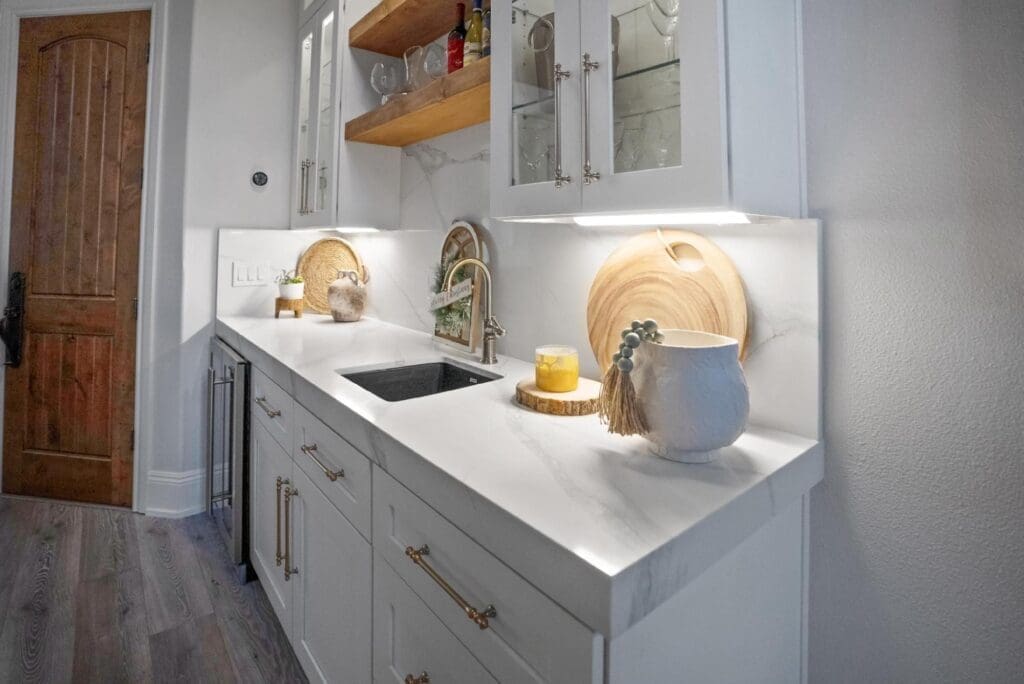
Above the wet bar, open wood floating shelves hold everyday glassware and a few bottles of wine, the same open-shelving logic we’ve covered elsewhere in kitchen remodels, applied here to a butler’s pantry instead of the main kitchen. It keeps frequently-used items in easy reach and adds a collected, lived-in look rather than a wall of closed cabinet doors. If you’re weighing open versus closed storage for a coffee bar area, our take is the same as it is for any kitchen: keep the everyday items open and reachable, and let closed cabinetry handle anything you don’t want on display.

Why a Butler’s Pantry Is the Right Home for a Coffee Bar

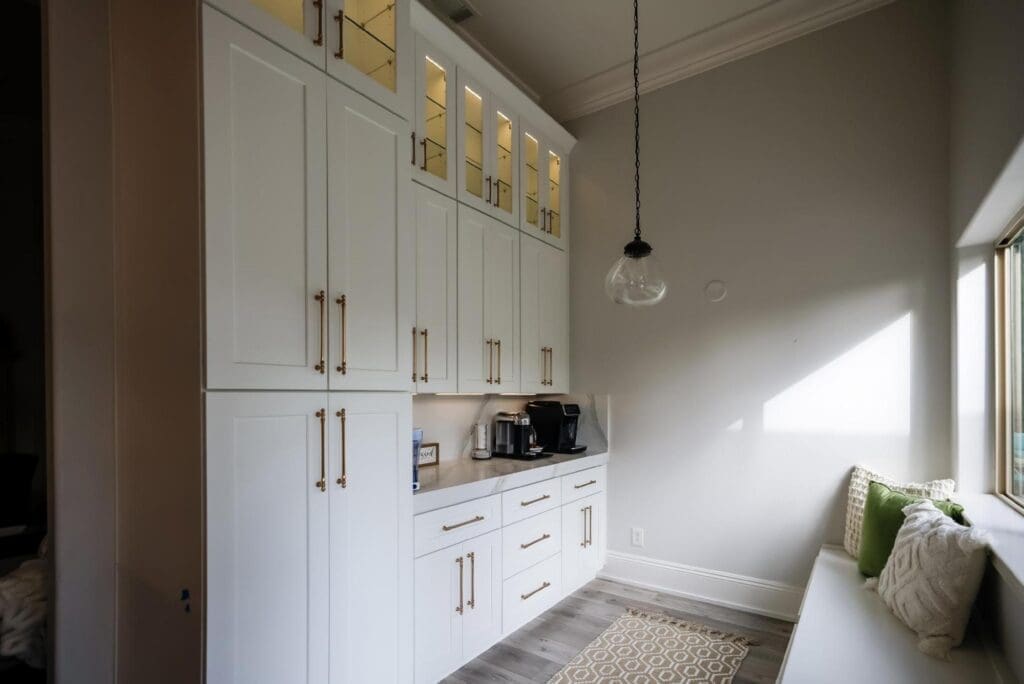
A coffee bar bolted onto the main kitchen counter almost always ends up in the way, it competes with meal prep, it collects clutter, and it’s usually the first thing guests bump into during a dinner party. Tucking it into a butler’s pantry solves all three problems at once: it gets its own dedicated footprint, its own storage, and its own identity separate from the main cooking zone. On this project, the butler’s pantry sits just off the kitchen, with floor-to-ceiling glass-front cabinetry that keeps everyday glassware and coffee supplies visible and easy to grab without opening a single door.

What’s Actually in This Coffee Station

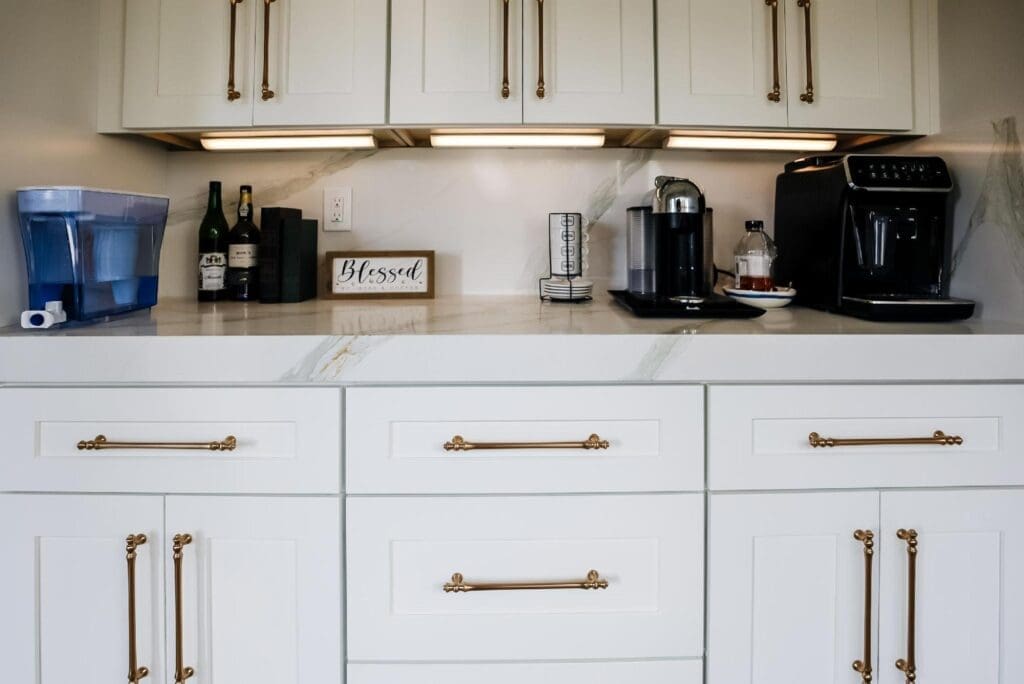
Up close, this is really two dedicated machines built into the counter: a single-serve brewer and a full automatic espresso machine, with a mug rack, a filtered water pitcher, and a small stash of syrup kept right there so nothing has to be carried in from the main kitchen. No appliances balanced on a shelf, no cords crossing the counter. That’s the small detail that separates a real coffee station from a coffee maker that happens to sit on a countertop.

Cost and What to Plan For

A basic built-in coffee station added into an existing pantry or closet typically runs $3,000–$8,000, covering cabinetry, a small prep sink hookup, and the electrical the equipment needs. A full butler’s pantry build-out like this one, with a coffee bar, wet bar, glass-front cabinetry, and matching finishes to the rest of the kitchen, runs considerably more, since it’s really a small second kitchen built as part of a larger remodel. Either way, the two things worth planning for early are electrical (dedicated circuits for an espresso machine and any small appliances) and plumbing (a prep sink adds real convenience but needs to be roughed in before drywall goes up).

Considering a Coffee Bar for Your Own Kitchen?

You don’t need a full butler’s pantry to add a coffee station, but if you’re already planning a kitchen remodel, it’s worth carving out the space for one; it’s consistently one of the most-used features homeowners tell us about after the project wraps. At America’s Advantage Remodeling, we’ve been doing this kind of work in the greater Sacramento area since 2001, and we’re happy to walk through your kitchen with you and figure out where a coffee bar or butler’s pantry could fit. Reach out for a free in-home consultation.

Frequently Asked Questions

Q: What is a butler’s pantry coffee bar?

A: A butler’s pantry coffee bar is a dedicated coffee and espresso setup built into a butler’s pantry — the small prep/storage room off the kitchen — rather than crammed onto the kitchen counter. It typically includes a built-in espresso machine or coffee maker, a small prep sink, storage for cups and grounds, and open shelving for everyday glassware, so the main kitchen counters stay clear.

Q: Do I need a butler’s pantry to add a coffee bar?

A: No, but a butler’s pantry makes it much easier to do well. Without one, a coffee bar usually means giving up a section of kitchen counter or upper cabinet; with a butler’s pantry, the coffee station gets its own dedicated footprint, plumbing, and storage without competing with the kitchen’s main cooking and prep zones.

Q: How much does a butler’s pantry coffee bar cost to add?

A: A basic built-in coffee station added to an existing butler’s pantry or large closet typically runs $3,000–$8,000, covering cabinetry, a small prep sink hookup, and electrical for the equipment; a full butler’s pantry build-out with a coffee bar, wet bar, and glass-front cabinetry (like the project featured here) runs considerably more as part of a broader kitchen remodel.

Q: What should be included in a coffee bar setup?

A: At minimum: a built-in or plumbed-in coffee/espresso machine, closed or open storage for mugs and supplies, and counter space for a grinder or accessories. Many homeowners also add a small prep sink for rinsing equipment and filling water reservoirs, plus open shelving nearby for everyday glassware — all of which this Land Park butler’s pantry includes.

Q: Does a butler’s pantry add resale value?

A: A well-built butler’s pantry is generally seen as a desirable, higher-end feature, particularly in homes with an open-concept kitchen where extra prep and storage space away from the main cooking area is valued. It won’t single-handedly drive a home’s resale value the way a full kitchen remodel does, but it’s consistently listed as an attractive feature in listings that have one.

Q: Can I add a coffee bar without a full kitchen remodel?

A: Yes — a coffee bar can be added to an existing closet, pantry, or underused cabinet run without touching the rest of the kitchen, as long as there’s access to an electrical outlet and, ideally, a water line nearby. It’s a smaller, standalone project that many homeowners tackle on its own rather than as part of a full remodel.

Floor-to-Ceiling Flat-Panel Cabinets: The Minimalist Kitchen Look More Elk Grove Homeowners Are Choosing Over Shaker

Опубликовано: September 1, 2026 в 8:17 am

Автор:

Категории: All

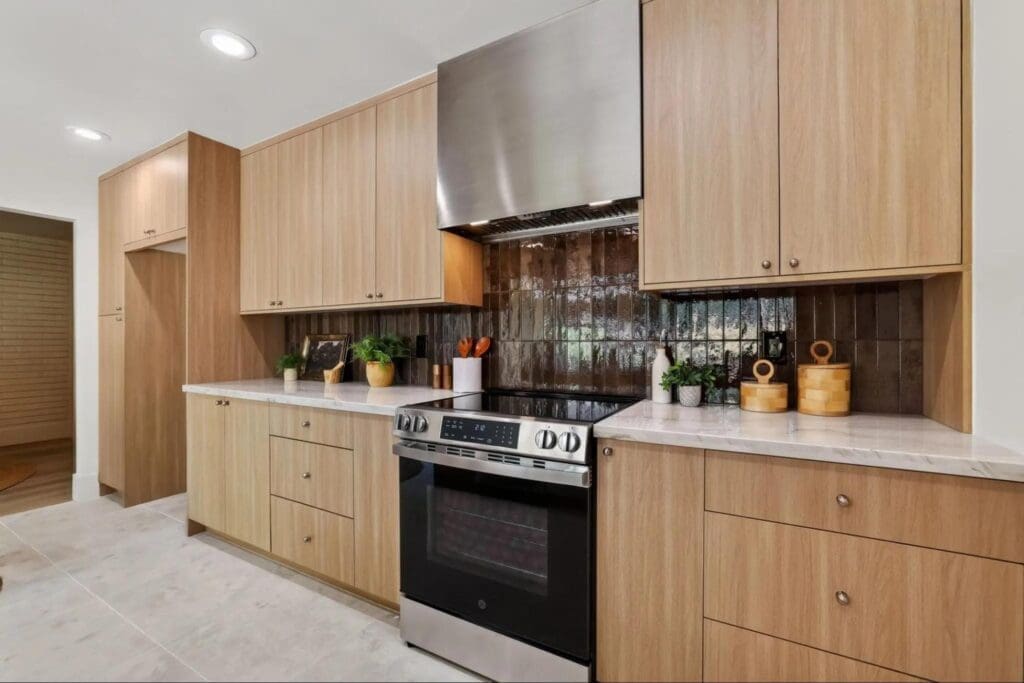
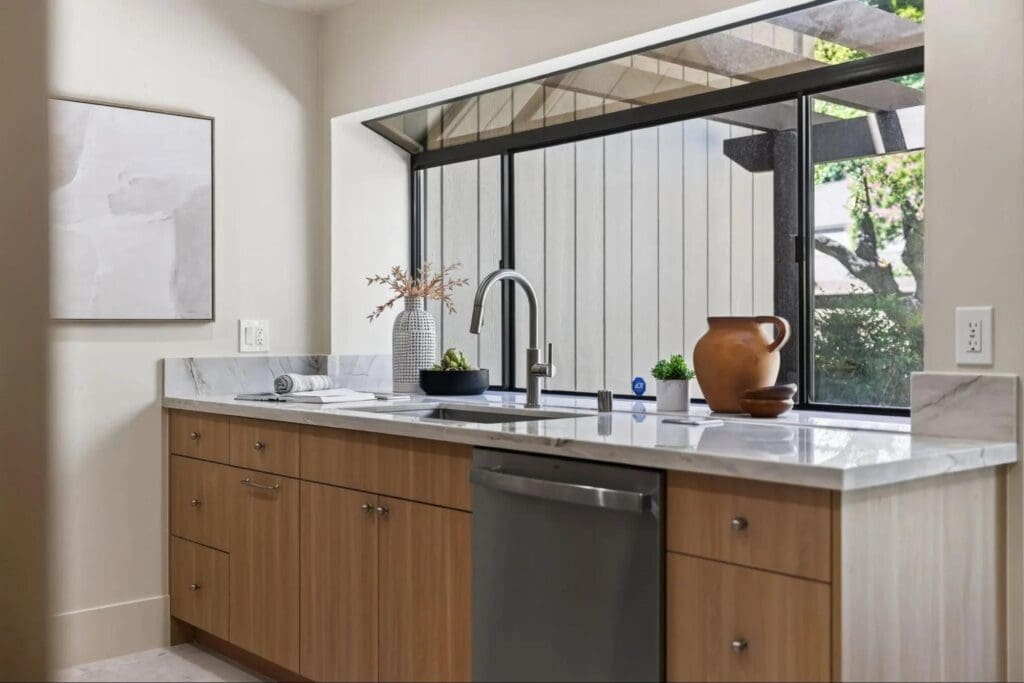
I’m Eugene Chernioglo, and after 25 years of kitchen remodels in the Sacramento area, I can tell you the shaker-cabinet debate isn’t as settled as it looks online. On a recent kitchen remodel we completed for a homeowner near Elk Grove — the kind of project that comes out of our Franklin-area and Elk Grove client base as often as it does anywhere else in Sacramento County — we went a different direction: floor-to-ceiling flat-panel cabinetry in a warm white oak tone, no shaker doors anywhere in the room. Here’s why more homeowners in this corridor are asking for that look, what it costs compared to shaker, and what to know before you commit to it.

Flat-Panel vs. Shaker: What Actually Changes

A shaker door has a recessed center panel framed by a squared edge — it’s the cabinet style most homeowners picture by default, and for good reason, it’s been the safe choice for years. A flat-panel (or slab-style) door skips all of that: one smooth, flat surface, no grooves, no raised trim. On this project, that flat surface runs the full height of the room, floor to ceiling, which is where the look really separates itself from a standard flat-panel kitchen that only goes up to a normal 36-inch upper-cabinet line.

Why Floor-to-Ceiling Changes the Math

Most kitchens leave a foot or two of dead space above the upper cabinets — a dust-collecting gap that either sits empty or gets used for decor nobody dusts. Running the cabinetry floor-to-ceiling eliminates that gap entirely and adds real, usable storage up top for things you access once or twice a year: seasonal serveware, large platters, small appliances you don’t want on the counter. It also does something for the room visually that a standard-height kitchen can’t: it pulls the eye straight up, which makes even a modest-sized kitchen read as taller and more spacious rather than boxed-in.

The tradeoff is access — the top sections of a floor-to-ceiling run usually need a step stool, so we typically reserve that top zone for the least-frequently-used items and keep everyday dishware within normal reach, the same way we’d plan any other cabinet layout.

Hardware, Cost, and What to Expect

Flat-panel doors are often slightly cheaper to manufacture than shaker doors, since they skip the recessed-panel milling step — but that price gap narrows fast once you add a floor-to-ceiling run, a premium wood-grain finish like the white oak tone here, or integrated/push-to-open hardware instead of standard pulls. Most flat-panel kitchens lean toward slim bar pulls or simple knobs rather than anything ornate, since the whole point of the style is an uninterrupted, clean-lined surface — busy hardware works against the look rather than with it.

On the practical side, flat-panel surfaces show fingerprints and water spots a little more readily than a textured or recessed-panel door, especially in a matte finish. That’s a minor tradeoff most homeowners find worth it for the look, but it’s worth knowing going in rather than being surprised by it after move-in.

Considering This Look for Your Own Kitchen?

Floor-to-ceiling flat-panel cabinetry isn’t the right call for every kitchen or every budget, but for homeowners in the Elk Grove and Franklin area who want a clean, modern look without sacrificing storage, it’s one of the strongest options we install. At America’s Advantage Remodeling, we’ve been doing this work in the greater Sacramento area since 2001, and we’re happy to walk your kitchen with you and talk through whether this style fits your space. Reach out for a free in-home consultation.

Frequently Asked Questions

Q: What are flat-panel (slab) kitchen cabinets?

A: Flat-panel, or slab-style, kitchen cabinets have a completely smooth, flat door front with no recessed center panel, grooves, or raised trim — the opposite of a shaker door’s framed look. They’re the foundation of a modern, minimalist kitchen, especially when they run floor-to-ceiling instead of stopping at a standard upper-cabinet height.

Q: Are flat-panel cabinets more expensive than shaker cabinets?

A: Not necessarily — flat-panel doors are often less expensive to manufacture than shaker doors because they skip the recessed-panel milling step, though the price gap narrows or reverses once you add floor-to-ceiling runs, integrated hardware, or a premium wood-grain finish like the white oak tone used in this Elk Grove-area remodel.

Q: Do flat-panel kitchens need special hardware?

A: No, but most homeowners pair them with slim bar pulls or knobs rather than the ornate hardware sometimes used on shaker doors, since the whole point of the slab look is a clean, uninterrupted surface. Some flat-panel kitchens skip visible hardware entirely in favor of push-to-open or integrated finger-pulls, though that’s a separate decision from the cabinet style itself.

Q: Do floor-to-ceiling cabinets make a kitchen feel bigger or smaller?

A: Floor-to-ceiling cabinetry almost always reads as more spacious, not less, because it eliminates the awkward dead space above standard upper cabinets and draws the eye straight up to the ceiling line. That vertical continuity is part of why this style pairs so naturally with the flat, seamless look of slab-style doors.

Q: Will flat-panel cabinets go out of style?

A: Flat-panel cabinetry has held steady as a modern-kitchen staple for over a decade, largely because its minimalism doesn’t depend on a specific color trend the way some finishes do. It’s a safer long-term bet than a heavily trend-driven look, especially in a neutral wood tone like the white oak finish shown here.

Q: What’s the difference between flat-panel and frameless cabinets?

A: They’re related but not identical: “flat-panel” describes the door style (a smooth, flat front), while “frameless” describes the box construction (no face frame around the cabinet opening). Most modern flat-panel kitchens, including this one, use frameless boxes as well, since the two choices are usually made together to maximize interior storage space and reinforce the clean-lined look.

Open Wood Shelving: Why It’s Replacing Upper Cabinets in This East Sacramento Kitchen Remodel

Опубликовано: September 1, 2026 в 8:12 am

Автор:

Категории: All,Kitchen

I’m Eugene Chernioglo, and here’s the straight story on open shelving in a kitchen remodel: it’s not just a Pinterest trend, and it’s not right for every kitchen either. On a recent kitchen, bathroom, and interior remodel we completed in East Sacramento (95819), the homeowners swapped a run of upper cabinets for open wood shelving flanking the range hood — and paired it with a navy waterfall-edge island. Here’s what that decision actually looks like day to day, what it costs, and how to know if it’s the right call for your own kitchen.

Why Homeowners Are Rethinking Upper Cabinets

Upper cabinets do one job well: they hide things. But they also box in a kitchen visually, especially a smaller one, and a lot of what ends up behind those doors is used maybe once a month. Open shelving flips that logic — it puts your everyday dishes, glassware, and a few good-looking pieces in easy reach, and it opens up sightlines to the ceiling instead of a wall of doors. It’s not the right move for every cabinet run in the kitchen, but it’s a strong one for the section right around a range hood or a prep zone, which is exactly where we used it on this project.

What Open Wood Shelving Actually Replaces

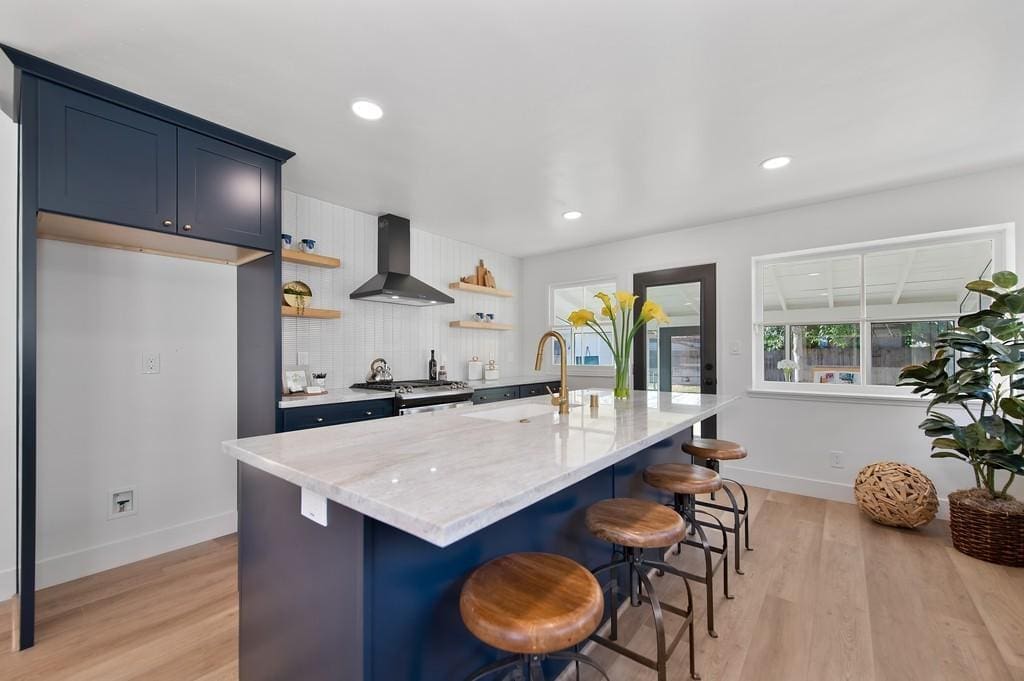
On this East Sacramento kitchen, we removed the upper cabinets that would normally flank the range hood and replaced them with two floating wood shelves on each side. The navy shaker cabinetry below stayed fully closed-storage, so the homeowners didn’t lose any actual storage capacity — they just relocated the visible, frequently-used items (everyday plates, mugs, cutting boards, a few styled bowls) up onto the shelves, and kept the less-visited stuff in the closed cabinetry elsewhere in the kitchen.

That’s the pattern we’d recommend for most kitchens considering this: don’t go all-in on open shelving everywhere. Pick the one or two runs where you actually want quick, visible access, and leave the rest of your upper cabinet storage closed. A kitchen with zero closed upper storage almost always ends up feeling less functional within a year, not more.

Cost, Materials, and What to Actually Store Up There

Simple floating wood shelves like these typically run $150–$400 per shelf installed, including the wood, finish, and bracket hardware — a fraction of the cost of an equivalent run of upper cabinets. Solid oak, walnut, and maple are the most common choices because they hold up to daily kitchen use and take a clear or lightly-tinted finish well. On this project, a warm natural wood tone was chosen specifically to contrast against the navy cabinetry, which is what makes the shelving read as a deliberate design choice instead of an afterthought.

As for what belongs on open shelves: everyday dishware, glasses, a stack of bowls, cutting boards, and a handful of styled items (a vase, a cookbook, a small plant) work well. Things that don’t belong there: small appliances, mismatched food storage containers, anything greasy that sits directly over a burner, or anything you’d be embarrassed to have a dinner guest see. If it’s not something you’d want on display, it belongs behind a door.

Pairing Open Shelving With a Waterfall Island

This kitchen’s open shelving doesn’t work in isolation — it’s part of a bigger layout that also includes a navy waterfall-edge quartz island with bar seating, visible in the wider view below. We won’t go deep on waterfall island design here since we’ve already covered that in detail elsewhere (see the internal link below); the short version is that the same navy-and-wood-tone contrast used on the shelving carries through to the island, which is what ties the whole kitchen together visually rather than reading as two separate design decisions.

Ready to Rethink Your Kitchen Storage?

Open shelving isn’t right for every kitchen, but if you’re tired of a wall of upper cabinets and want a look that feels lighter and more personal, it’s worth a real conversation with a designer who can tell you which runs make sense to open up — and which ones should stay closed. At America’s Advantage Remodeling, we’ve been doing this work in the Sacramento area since 2001, and we’re happy to walk your kitchen with you and figure out what fits. Reach out for a free in-home consultation and we’ll show you what’s possible.

Frequently Asked Questions

Q: Is open shelving in a kitchen a bad idea?

A: Open shelving works well when you’re intentional about what goes on it — everyday dishware, glassware, and a few styled pieces, not the whole pantry. It’s not a bad idea, but it’s not a drop-in replacement for every upper cabinet either; most homeowners keep at least one or two closed cabinets nearby for small appliances, mismatched containers, and anything they don’t want dusted weekly.

Q: Do open shelves get dusty and greasy?

A: Yes, more than a closed cabinet does, especially the shelf closest to the cooktop. In this East Sacramento remodel, the open shelves sit beside the range hood rather than directly above the burners, which keeps grease buildup manageable. A quick wipe-down every week or two is realistic; daily maintenance is not required unless the shelves sit directly in the cooking zone.

Q: How much does it cost to add open shelving to a kitchen remodel?

A: Simple floating wood shelves typically run $150–$400 per shelf installed, including bracket hardware and finish work, far less than an equivalent run of upper cabinets. The bigger cost driver is usually what’s happening elsewhere in the kitchen at the same time — new cabinetry, a waterfall island, or a full layout change — not the shelving itself.

Q: What wood works best for open kitchen shelves?

A: Solid oak, walnut, and maple are the most common choices because they hold up to daily use and take a clear or lightly-tinted finish well. In this project, a warm natural wood tone was chosen specifically to contrast with the navy cabinetry below — a pairing that reads as intentional rather than mismatched.

Q: Should open shelving replace all of my upper cabinets?

A: Usually not entirely. The most functional kitchens use open shelving to replace one or two runs of upper cabinets — typically near a range hood or a sink, where you want frequently-used items in easy reach — while keeping closed storage everywhere else. A kitchen with zero closed upper storage tends to feel less practical day to day.

Q: Does open shelving work in a small kitchen?

A: It can, and it often helps a small kitchen feel less boxed-in than a wall of upper cabinets does, since it keeps sightlines open to the ceiling. The tradeoff is that a small kitchen has less room to hide clutter, so open shelving in a tight space works best when paired with strong closed storage elsewhere, like a full-height pantry wall.