Admin, Author At America's Advantage Remodeling

Посты автора admin

admin

admin

A Wall Niche and a Statement Hood: The Details Finishing This Land Park Kitchen
Опубликовано: September 29, 2026 в 10:57 am

Автор:

Категории: All,Kitchen

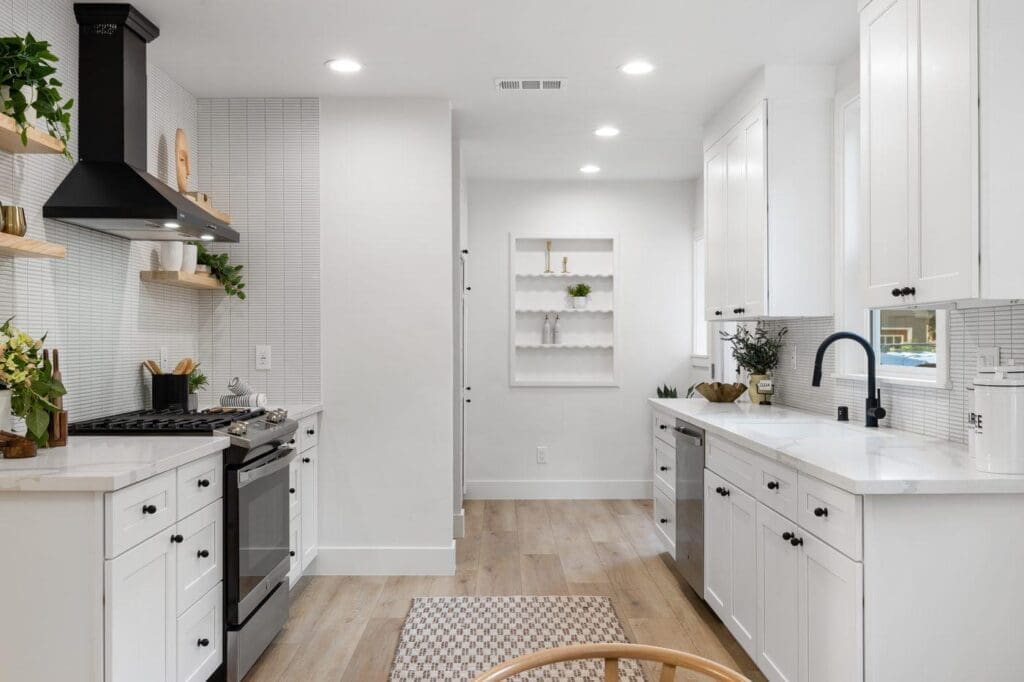
Most kitchen remodels spend their attention on cabinets, counters, and the range wall — and rightly so. But the wall that connects the kitchen to the rest of the house often gets left flat, purely functional, and a little forgettable. In this Land Park kitchen remodel, that transition wall got a built-in niche instead — a small, considered detail that turns a stretch of blank drywall into something worth looking at, right alongside a matte black range hood that anchors the cooking wall on its own.
A Niche Where a Blank Wall Used to Be

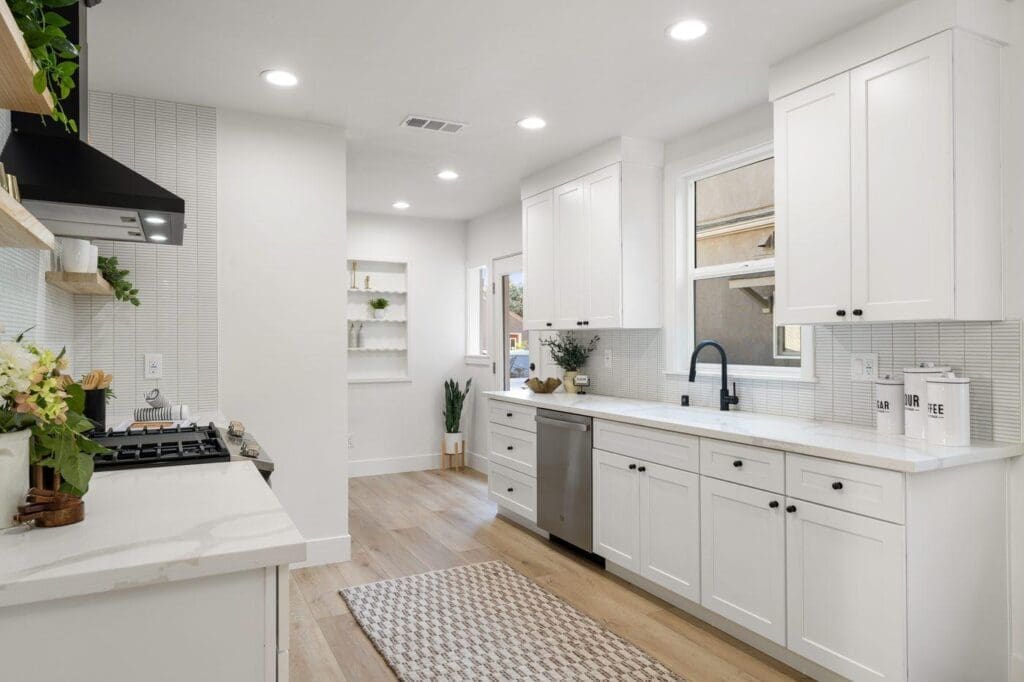
The niche sits at the transition between the kitchen and the hallway, framed in during construction rather than added on afterward. It’s shallow — just enough depth to hold a candle, a small vase, or a stack of coasters — and it’s finished with the same clean trim as the rest of the kitchen’s millwork. That transition wall would otherwise be the kind of space nobody notices; here, it’s the kind of detail that makes the whole kitchen read as custom rather than builder-grade.
A Range Wall That Doesn’t Need Upper Cabinets

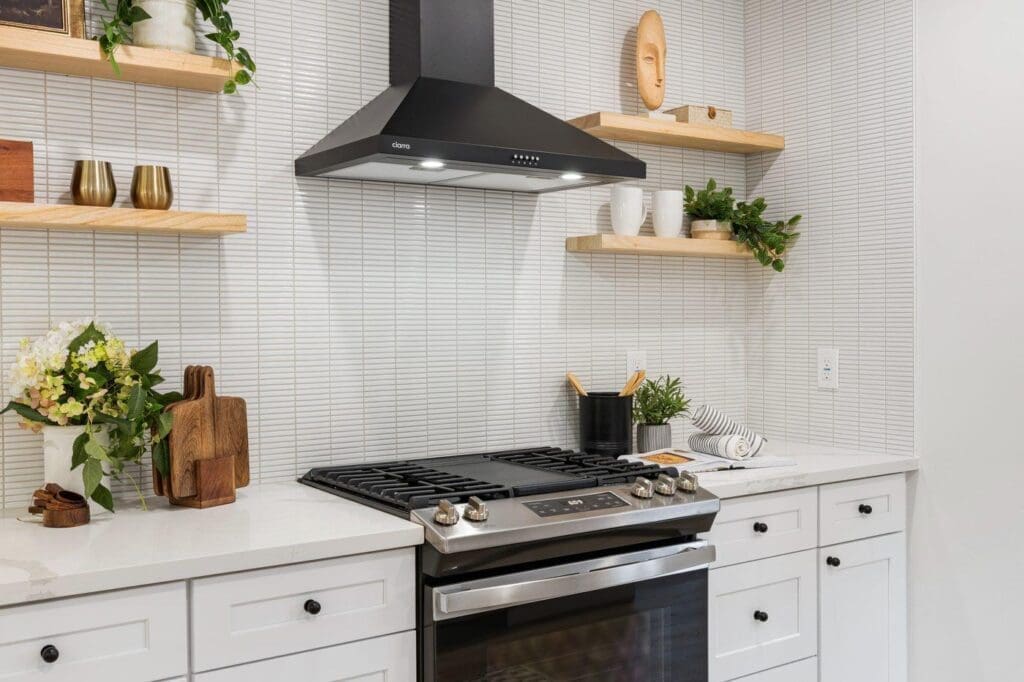
The cooking wall takes a different approach to the same idea — using absence instead of addition. A matte black range hood is mounted straight to a vertical-tile backsplash, with open wood shelves on either side standing in for upper cabinets entirely. The vertical tile lines lead the eye up to the hood instead of competing with it, and the open shelves keep the wall from feeling heavy the way a bank of cabinet doors next to a dark hood sometimes can. It’s a simpler wall than a full cabinet run, and it reads as more deliberate for it.
Small Details, Considered Together

Neither the niche nor the open shelving is a big-ticket item in a remodel budget — they’re both finishing touches rather than structural changes. But seen together, they show the same instinct at work on two different walls: don’t leave a stretch of wall doing nothing when it could be doing something, and don’t add bulk where a lighter touch would look more finished. That’s the kind of thinking that separates a kitchen that feels put-together from one that just feels new.

Ready to Rethink Your Own Kitchen’s Details?

If your kitchen remodel is more than cabinets and countertops — if you’re thinking about the walls in between, too — America’s Advantage Remodeling has been planning kitchen remodels in the greater Sacramento area since 2001. Reach out for a free in-home consultation and we’ll walk through which small details are worth building into your kitchen remodel plan.

Frequently Asked Questions

Q: What is a kitchen wall niche?

A: A wall niche is a shallow, built-in recess set into a wall during framing, finished with drywall and trim (or tile) instead of left as flat wall space. In a kitchen, it’s most often used at a transition point — a hallway opening, a stretch of wall next to a doorway — to hold a small display of decor, candles, or everyday items without adding a cabinet or shelf that projects into the walkway.

Q: Where does a wall niche work best in a kitchen?

A: The best spots are transition walls that aren’t wide enough for cabinetry or a full shelf run — a hallway opening, the wall beside a pantry door, or a narrow stretch between two rooms. These are places that would otherwise sit completely blank; a niche gives that dead wall space a job without eating into usable counter or storage area.

Q: Is a wall niche just decorative, or does it do anything functional?

A: It’s mostly decorative, but it earns its keep by solving a real problem: an unbroken run of drywall in a transition space can feel unfinished, especially in an open-concept layout where that wall is visible from multiple rooms at once. A niche breaks up the flat plane and gives the eye something considered to land on, without requiring furniture or wall art that could get bumped in a walkway.

Q: Does a matte black range hood need a specific kind of backsplash?

A: No specific backsplash is required, but a vertical or textured tile reads differently behind a matte black hood than a flat subway pattern would — the vertical lines draw the eye upward and give the hood room to be the visual anchor of the wall instead of competing with a busier tile layout. A simpler tile choice also keeps the open shelving on either side from feeling cluttered.

Q: Why use open shelving next to a range hood instead of upper cabinets?

A: Upper cabinets directly beside a hood can start to feel heavy, especially when the hood itself is already a dark, substantial fixture. Open wood shelving keeps that same wall lighter and gives the range wall a place to display everyday items — mugs, small plants, cutting boards — without the visual weight of another bank of doors right next to the hood.

Q: Is a built-in wall niche expensive to add during a kitchen remodel?

A: It’s a relatively low-cost addition compared to cabinetry or a structural change — it’s primarily a framing and finishing detail, not a new fixture. The cost depends on size, trim detail, and whether it’s tiled or painted to match the wall, but it’s one of the more affordable ways to add a custom, built-in-feeling detail to a remodel.
A Galley Layout and a Barn-Door Pantry: The Details Behind This Bell Air Kitchen Remodel

Опубликовано: September 29, 2026 в 10:53 am

Автор:

Категории: All,Kitchen

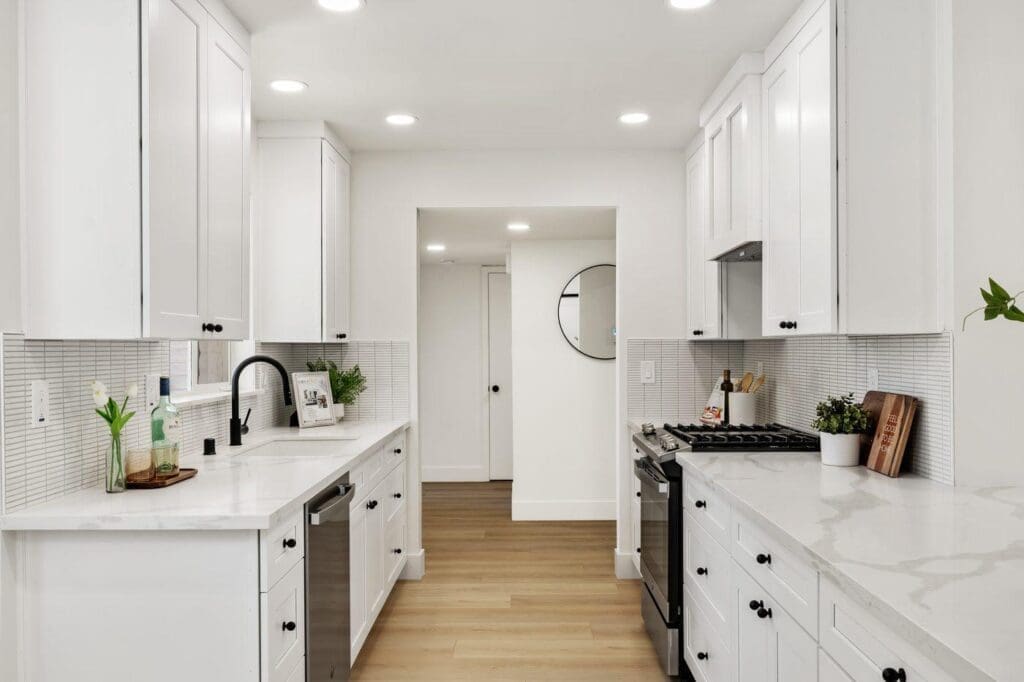
“Isn’t a galley kitchen too cramped to actually cook in?” is a fair question to ask before a remodel, and the honest answer is: it doesn’t have to be. In this Bell Air kitchen remodel, the existing two-wall galley layout stayed exactly where it was; the changes were in the finishes, the lighting, and one small but genuinely useful detail at the end of the run: a pantry closet with a sliding barn door instead of a swinging one.

Two Walls, Done Right

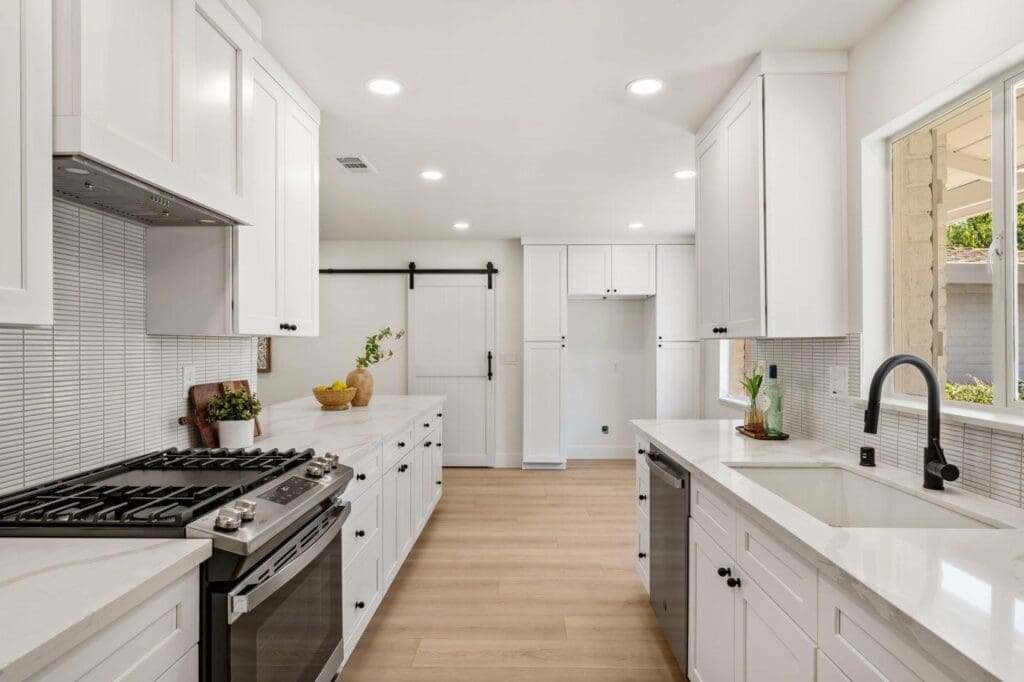
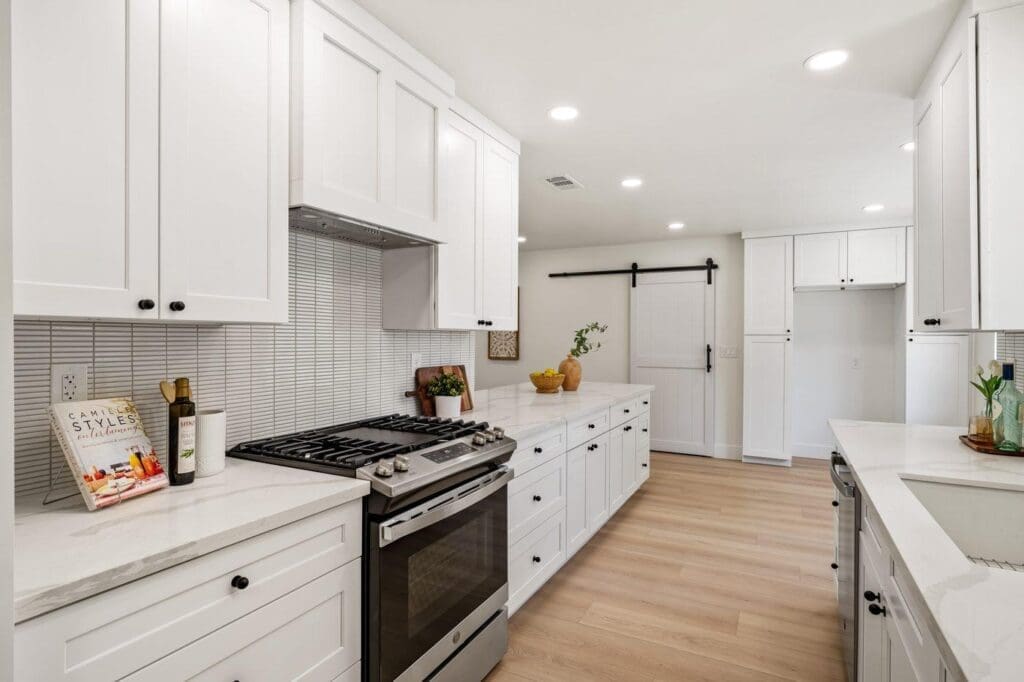
The cooking wall features white shaker cabinetry, a full-height subway-tile backsplash, and a gas range with black hardware that matches the rest of the kitchen. At the far end of the run, a black-framed sliding door is mounted flush against the wall; that’s the pantry, and the barn-door track above the opening is the reason it can sit at the very end of a narrow galley aisle without ever needing floor clearance to swing open.

Why the Barn Door Earns Its Keep Here

A standard hinged pantry door needs several feet of clear floor space in front of it to open, space a galley kitchen’s walkway usually can’t spare. A sliding barn door solves that by moving along a track instead of swinging into the room, which is exactly why it shows up in tight kitchens, laundry rooms, and bathrooms more than anywhere else. On the opposite wall, the sink and dishwasher sit beneath more of the same white shaker cabinetry and quartz counters, and the run opens directly into a hallway with a round mirror at the end, keeping the galley from ever feeling like a closed-off corridor.

A Layout That Doesn’t Need to Be More Complicated

Not every kitchen remodel needs to knock out a wall or add an island to feel finished. Keeping this kitchen’s original two-wall footprint meant the plumbing and electrical mostly stayed where they already were, and the whole project came down to new cabinetry, counters, tile, and that one smart pantry-door swap, a more efficient scope than a layout change would have required, with a galley kitchen that now works exactly as well as it looks.

Seeing the Barn Door in Context

Pulled back a bit further, this same cooking wall shows how naturally the barn-door pantry sits alongside the rest of the run: the range hood, the subway tile, and — just past the pantry,  a full-height built-in cabinet tower that adds storage without needing a single extra square foot of floor space. It’s a good example of how a galley kitchen can pack in real function without ever feeling cramped.

Considering a Kitchen Remodel of Your Own?

Whether your kitchen is a full open-concept rebuild or, like this one, a layout worth keeping as-is, America’s Advantage Remodeling has been remodeling kitchens in the greater Sacramento area since 2001. Reach out for a free in-home consultation and we’ll walk through what’s possible in the kitchen you already have.

Frequently Asked Questions

Q: What is a galley kitchen layout?

A: A galley kitchen has two parallel walls of cabinets and appliances facing each other with a walkway in between, usually open at one or both ends. It keeps the sink, stove, and refrigerator within a few steps of each other, which makes it one of the most efficient layouts to actually cook in, even though it’s often associated with smaller homes.

Q: Is a galley kitchen too small for a family?

A: Not necessarily. A galley kitchen can work well for a family as long as it’s finished with light cabinetry, enough counter space, and, ideally, open at one end into an adjoining room, which keeps it from feeling closed off. The layout itself isn’t the limiting factor; how it’s finished and where it connects to the rest of the home is.

Q: What is a barn-door pantry?

A: A barn-door pantry is a pantry closet whose door slides along a track mounted above the opening instead of swinging outward on hinges. In a narrow galley kitchen, that matters: a swinging door needs clearance in the walkway to open, while a sliding barn door takes up none.

Q: Why use a sliding barn door instead of a regular pantry door?

A: The main reason is space: a hinged door needs several feet of clear floor area to swing open, which a narrow galley aisle often doesn’t have to spare. A sliding barn door eliminates that swing radius, and it adds a visible style detail; most are hung in a contrasting black hardware finish, in a spot that would otherwise be a plain closet door.

Q: Do galley kitchens cost less to remodel than open-concept kitchens?

A: Generally, yes. The layout itself doesn’t change, so a galley remodel is typically two straight runs of cabinetry rather than an L-shape, a U-shape, or an island, and most of the existing plumbing and electrical can stay where it already is. That usually means a shorter timeline and a smaller budget than a layout that adds or removes walls.

Q: Can a galley kitchen still feel open?

A: Yes, especially when it’s left open at one end into a hallway, dining area, or living space rather than closed off with a door on both ends. Light cabinetry, a consistent wood floor running through the opening, and sightlines into the next room all help a galley kitchen read as connected to the rest of the house rather than boxed in.

A Garage Converted Into Flex Space: The Details Behind This Land Park Remodel

Опубликовано: September 29, 2026 в 10:48 am

Автор:

Категории: All

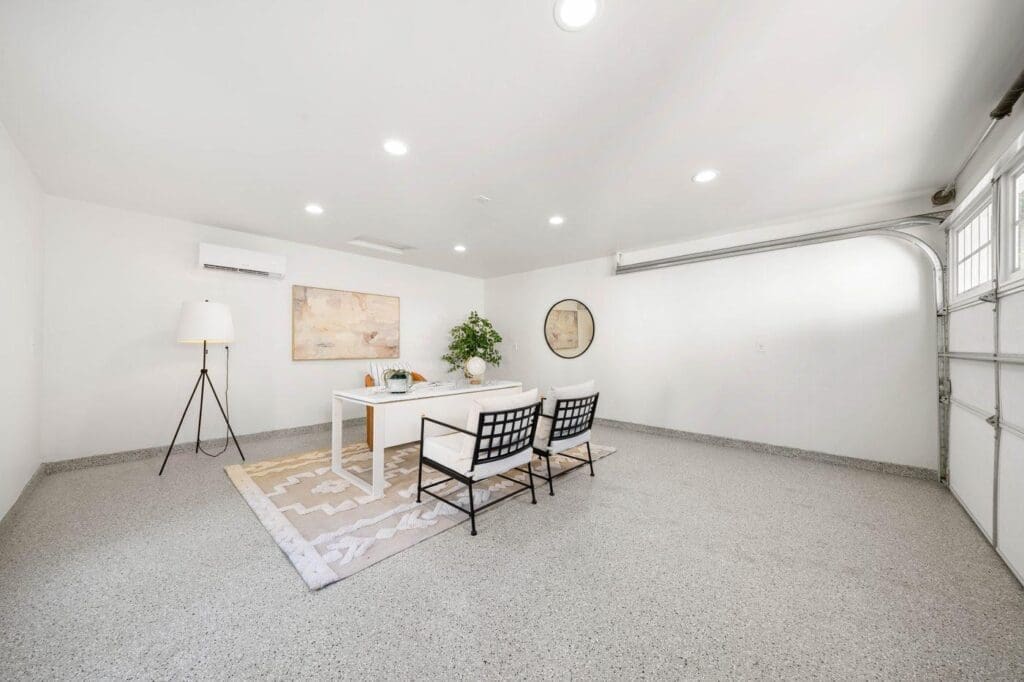
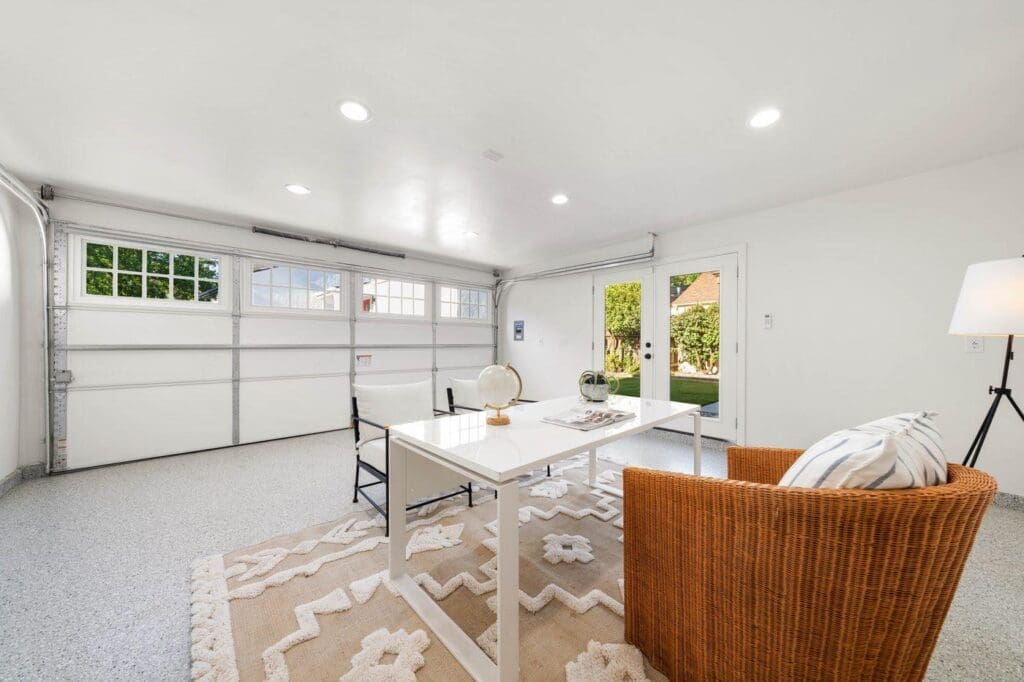
Not every square foot in a full home remodel has to be a bedroom, a bathroom, or a kitchen. In this Land Park home remodel, the attached garage was converted into flex space instead, finished, climate-controlled, and light-filled, but deliberately left open-ended rather than built out for one single purpose. The same room shows up in two different roles here: staged as a home office in one view, and as a dining or sitting space in the other.

A Garage That Kept Its Garage Door

The most telling detail in this conversion is what wasn’t changed: the garage door and its window panels are still there, now doing the job of a wall of windows instead of an entry point for a car. The room got a durable flake-coated floor, fresh paint, recessed lighting, and a mini-split unit for heating and cooling, the essentials for making a garage feel like a real living space, without the cost or disruption of tearing out the slab or reframing the opening. Styled here with a lacquered desk, wire-frame chairs, and a floor lamp, it reads as a legitimate home office rather than a garage with furniture in it.

The Same Room, Staged a Second Way

From the opposite corner, the same space is set up as a dining or flex sitting area instead: a lacquered table, a woven chair, and French doors leading straight out to the backyard. Nothing structural changed between the two setups; only the furniture did. That’s the real value of converting a garage into flex space rather than a fixed single-purpose room: the finish work is done once, and the room can be restyled for whatever a homeowner needs most at the time, without another remodel.

A Cost-Effective Way to Add Real Square Footage

Converting an existing garage is a fraction of the cost of a new room addition, since the walls, roof, and concrete slab are already in place;  the work is mostly flooring, insulation, electrical, and finishes rather than new construction. For a full home remodel that’s already bringing crews and materials on site, finishing an attached garage this way is one of the more efficient ways to add genuinely usable interior space.

Ready to Rethink the Space You Already Have?

If your home remodel plans have you looking past the kitchen and bathrooms, at a garage, a bonus room, or any other space that isn’t pulling its weight yet, America’s Advantage Remodeling has been planning full home remodels in the greater Sacramento area since 2001. Reach out for a free in-home consultation, and we’ll walk through what a space like this could become in your own home.

Frequently Asked Questions

Q: What is a garage “flex space” conversion?

A: A garage flex space conversion turns an attached garage into usable interior living space; an office, sitting room, or dining area, while leaving the option to convert it back or use it for more than one purpose. It’s a lighter-touch version of a full garage conversion, often keeping the original garage door and framing in place rather than replacing them with a permanent wall.

Q: Do you need to remove the garage door to convert a garage into living space?

A: No, leaving the garage door in place is a common approach, especially for a flex space rather than a permanent single-purpose room. The door’s window panels bring in natural light the same way a wall of windows would, and keeping the door means the space could still function as a garage again in the future if a homeowner’s needs change.

Q: Is a converted garage the same thing as an accessory dwelling unit (ADU)?

A: Not necessarily. An ADU is a separate, permitted living unit that typically needs its own kitchen, bathroom, and entrance to qualify legally. A garage flex space is a simpler interior conversion, finished flooring, paint, and climate control added to make the room comfortable, without the plumbing and permitting work a full ADU requires.

Q: What kind of flooring works well in a converted garage?

A: A durable, easy-to-clean flake or epoxy floor coating is a common choice, since it goes directly over the existing garage slab without a full subfloor build-out. It holds up well, looks finished rather than utilitarian, and costs less than tearing out the slab to install another flooring type.

Q: Can a converted garage serve more than one purpose?

A: Yes, because the space isn’t built out with fixed, room-specific features, it can be restyled for different uses: a desk and seating for a home office one day, a table and chairs for a dining or entertaining space another. That flexibility is a large part of the appeal compared to a single-purpose room addition.

Q: Is converting a garage into flex space expensive compared to building a new addition?

A: It’s typically far less expensive than a new addition, since the walls, roof, and slab already exist; the work is mostly flooring, insulation, climate control, and finishes rather than new construction. Costs vary with how much climate control and finish work is involved, but it’s generally one of the more cost-effective ways to add usable interior square footage.

One Tower, Two Appliances: Why This Elk Grove Kitchen Skipped the Countertop Microwave

Опубликовано: September 21, 2026 в 4:42 pm

Автор:

Категории: All,Kitchen

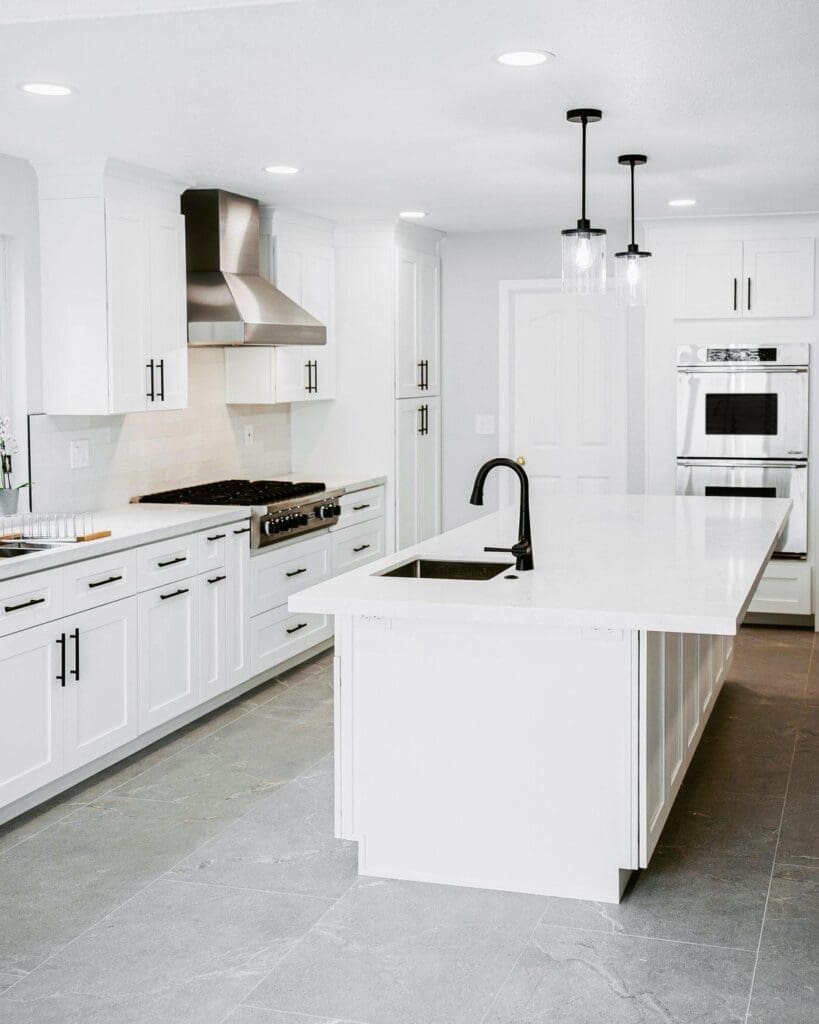
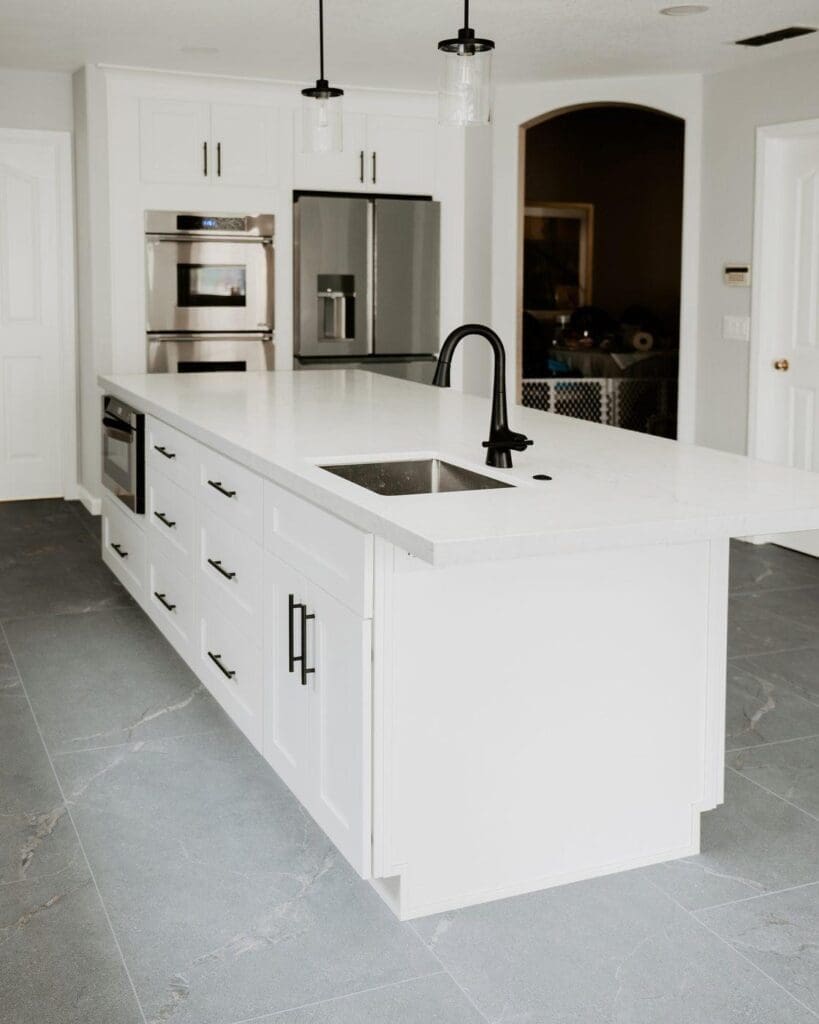
The last kitchen we featured from this Elk Grove kitchen remodel was about the details that do the everyday work: a prep sink, a range wall, cabinetry hardware. This time it’s a single decision that shapes the whole layout — instead of a wall oven in the cabinetry and a separate microwave taking up counter space, this kitchen builds both into one stacked tower against the same wall as the refrigerator. No countertop microwave, no dedicated cabinet for one, and no lost prep space to make room for it.

One Tower Does the Job of Two Appliances

The stacked column sits between the refrigerator and the island, with a full-size wall oven and a built-in microwave sharing one cabinet cutout. It’s a different trade-off than a double wall oven setup that pairs two full-size ovens for more cooking capacity; this household uses the microwave daily and rarely needs two ovens running at once, so the second cavity became a microwave instead of a second oven. Either version solves the same problem, getting appliances off the counter and into the wall, but the tower’s mix of one full oven and one microwave is built for everyday reheating and quick tasks, not for cooking multiple full dishes at the same time.

What Skipping the Countertop Microwave Actually Buys You

A standard countertop microwave and the clearance around it can take up two to three feet of counter length, real prep space in a single-run kitchen like this one. Building the microwave into the wall tower instead frees that stretch of counter for cutting boards, small appliances, or just clear space, and it also removes the need for a dedicated cabinet to store a microwave that would otherwise sit on the counter. The trade-off is real: that wall cabinet space is now for appliances, not storage. For a kitchen already tight on counter length, most homeowners find that trade worth making.

Planning This Into Your Own Kitchen Remodel

A combo tower needs to be decided early, not added on. The cabinet cutout, venting, and electrical for a built-in wall oven and microwave are sized differently than a standard oven cabinet, so this has to be locked in before cabinetry is ordered, not adjusted afterward. It’s also worth deciding oven-and-microwave placement based on daily use; the microwave should land at a height you’ll actually reach for multiple times a day, not wherever leaves the cleanest cabinet layout on paper.

Considering a Kitchen Remodel of Your Own?

Whether it’s a full double wall oven setup or a combo tower like this one, the right call comes down to how you actually cook, not which layout looks best in a photo. At America’s Advantage Remodeling, we’ve been planning kitchen remodels in the greater Sacramento area since 2001, and we’re happy to walk through which appliance layout fits how your household uses a kitchen. Reach out for a free in-home consultation.

Frequently Asked Questions

Q: What is a built-in oven and microwave combo tower?

A: It’s a single stacked column, built into a cabinet wall, that pairs a full-size wall oven with a built-in microwave directly above or below it, combining two appliances into one footprint instead of putting a wall oven in the cabinetry and a separate microwave on the counter.

Q: Is a wall oven and microwave combo better than a double wall oven?

A: It depends on how you cook: a double wall oven gives you two full ovens for cooking multiple dishes at once, while a combo tower trades that second oven for a built-in microwave, which is the better trade for households that use a microwave daily but rarely need two ovens running at the same time.

Q: Does a built-in microwave take up cabinet space that could be used for storage?

A: Yes, a built-in microwave uses cabinet space that could otherwise hold storage, which is the main trade-off homeowners weigh against it, but it also frees up the same amount of counter space that a standalone microwave would otherwise occupy, and clears a cabinet elsewhere that would have stored it.

Q: Where should a built-in microwave go in a combo tower, above or below the oven?

A: Placing the microwave below the wall oven, at counter height or just above it, keeps the most frequently used appliance within easy reach without requiring a step stool, while placing it above the oven suits kitchens where counter-height cabinet space is already tight.

Q: Does removing the countertop microwave actually free up much counter space?

A: A standard countertop microwave and its clearance typically take up two to three feet of counter length, so removing it from the counter can open up a meaningful stretch of usable prep space, especially in a galley-style or single-run kitchen layout.

Q: Is a built-in oven and microwave combo more expensive than separate appliances?

A: It’s usually more expensive than a standard wall oven plus a countertop microwave, since combo units and their matching cabinet cutouts cost more than off-the-shelf separate appliances, but it can cost less than a full double wall oven setup depending on the brand and size chosen.

Bigger Than a Light Fixture: The Pendant and Cabinet Details Finishing This Meadowview Kitchen

Опубликовано: September 21, 2026 в 8:00 am

Автор:

Категории: All

“Do we really need a whole extra room just for coffee?” is the kind of question that comes up whenever a butler’s pantry is on the table, and it was the centerpiece of the last kitchen we featured from this Rocklin kitchen remodel. But the main kitchen itself has two details that get less attention and just as much daily use: a pair of oversized hammered brass pendant lights over the island, and a run of glass-front upper cabinets with built-in lighting for display. Here’s what makes each one work.

Oversized Pendants Do More Than Light the Counter

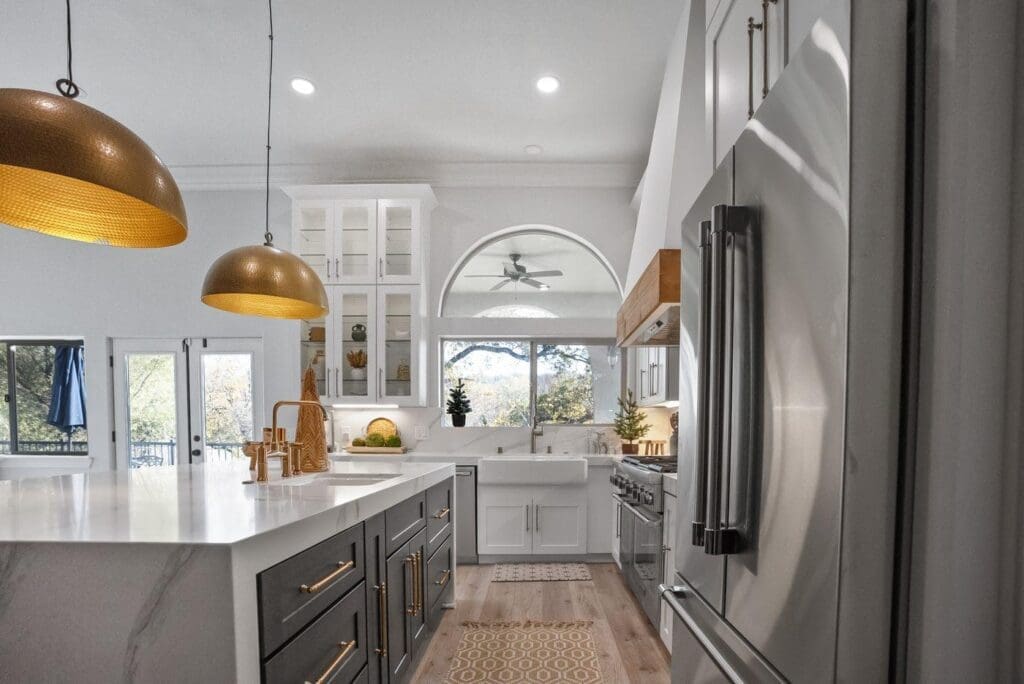
Two large hammered brass dome pendants hang over this kitchen island, and their size is the point; a pair of oversized fixtures fills the same visual space that three or four smaller pendants would need, without the cluttered look a row of small lights can create. The hammered texture catches light differently than a smooth or glossy metal finish would, giving the fixtures a handmade quality that tends to hold up better over time than a glossier, more trend-driven pick. Positioned in front of a large arched window, the pendants also become a focal point during the day, not just after dark.

Glass-Front Cabinets Turn Storage Into Display

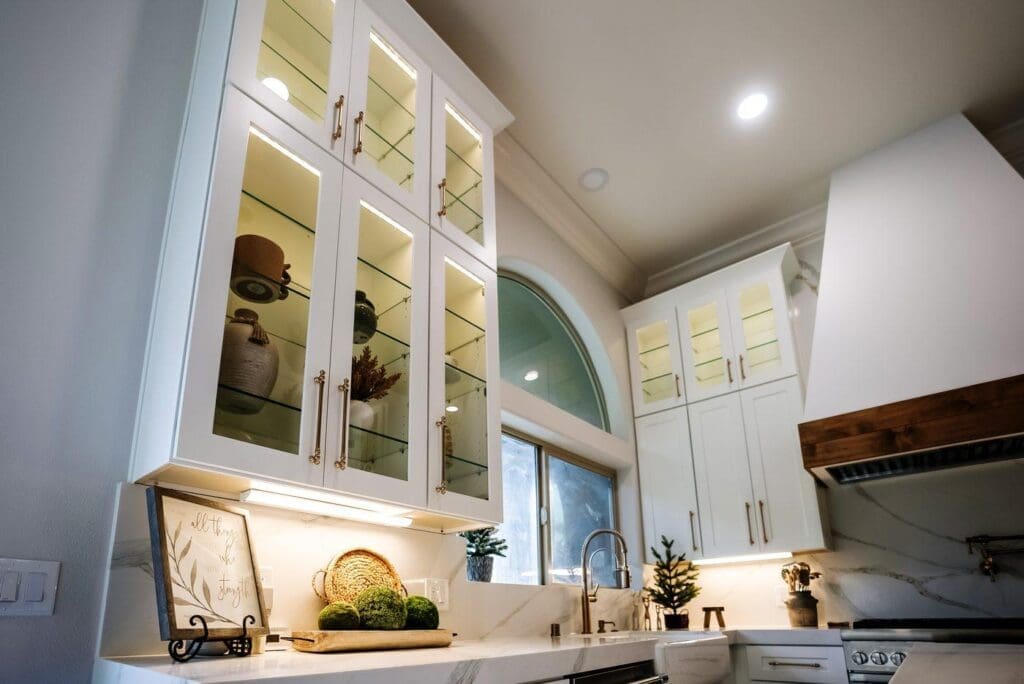
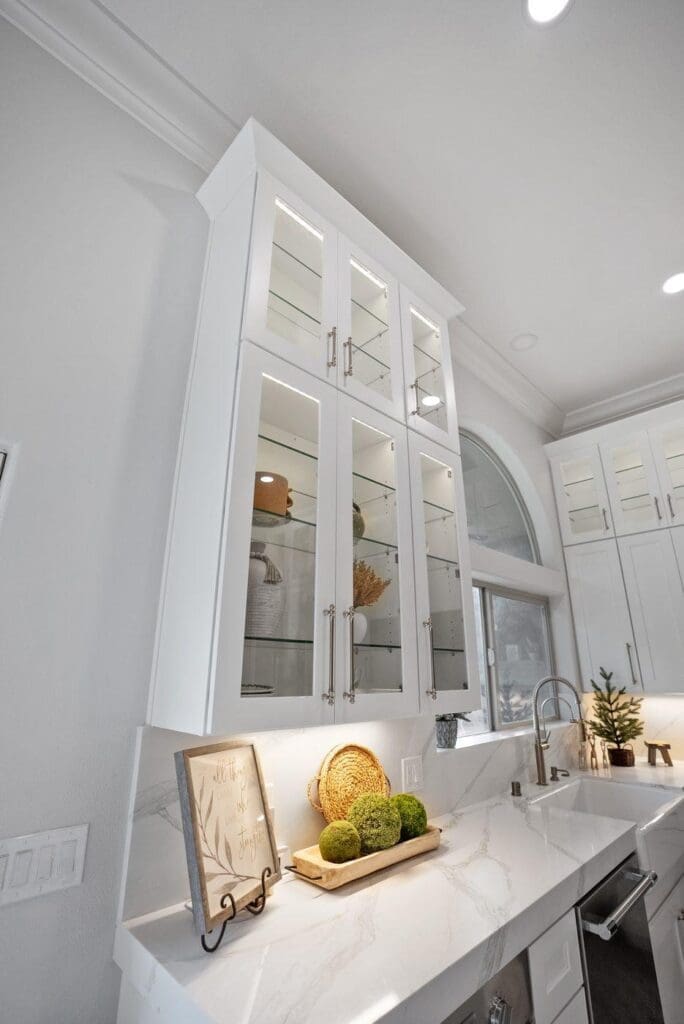
The upper cabinets along this kitchen’s back wall swap solid doors for glass fronts, with built-in interior lighting behind each shelf. It’s a deliberate split from the solid-door cabinets doing the heavier, everyday storage elsewhere in the kitchen; glassware, serveware, and decor go on display here, while the items you don’t want visible stay behind solid doors. The interior lighting is what makes the difference after dark, turning the cabinets into a lit feature instead of a dark box behind glass, and it’s a detail that has to be wired in during the remodel rather than added on later.

Planning These Details Into Your Own Kitchen Remodel

Both details are easiest to get right at the design stage. Pendant placement and fixture scale need to be worked out against the island’s actual length before electrical rough-in, not after the island is installed. Glass-front cabinet lighting needs its own wiring planned into the upper cabinet framing, and it’s worth deciding early which items in your own kitchen are worth putting on display versus which ones belong behind a solid door.

Considering a Kitchen Remodel of Your Own?

A butler’s pantry or a custom range hood tends to get the attention, but lighting and cabinet choices like these are what a kitchen lives with every day. At America’s Advantage Remodeling, we’ve been planning kitchen remodels in the greater Sacramento area since 2001, and we’re happy to walk through which details are worth the extra planning in your own kitchen. Reach out for a free in-home consultation.

Frequently Asked Questions

Q: What’s the benefit of oversized pendant lights over standard-sized ones?

A: Oversized pendants scale to a large island in a way that a row of small pendants can’t; one or two large fixtures fill the visual space above the counter without looking cluttered, and they read as a design statement rather than just a light source.

Q: Are hammered metal pendant lights a passing trend?

A: Hammered metal finishes have stayed in steady rotation for years because the texture reads as handmade rather than mass-produced, so it tends to age better than a glossy or heavily trend-driven finish that can look dated within a few years.

Q: What should go in glass-front kitchen cabinets versus solid ones?

A: Glass-front cabinets work best for dishware, glassware, and decor meant to be seen, while everyday clutter and mismatched storage containers are better kept behind solid doors. Mixing both in the same kitchen lets you show off what looks good and hide what doesn’t.

Q: Do glass-front cabinets need interior lighting?

A: It’s not required, but built-in LED lighting inside a glass-front cabinet makes a real difference after dark, turning the display into a lit feature instead of a dark box behind glass, and it’s far easier to wire in during a full remodel than to retrofit later.

Q: How many pendant lights should hang over a kitchen island?

A: It depends on the island’s length and the fixture size; two oversized pendants often cover the same visual space as three or four smaller ones, so the right count comes down to the scale of the fixture chosen, not a fixed rule.

Q: Does pendant lighting need to match the kitchen’s cabinet hardware?

A: It helps for cohesion, but an exact match isn’t required; a warm brass or gold-toned pendant reads well against most cabinet hardware finishes as long as the overall palette (warm metals vs. cool metals) stays consistent throughout the kitchen.

A Sink With a View: The Window Placement and Pantry Wall Details Making This South Land Park Kitchen Work

Опубликовано: September 17, 2026 в 8:58 am

Автор:

Категории: All,Kitchen

A custom range hood tends to be the feature everyone notices first in a kitchen remodel; it’s the obvious showpiece. But in this South Land Park kitchen, two quieter decisions do just as much of the daily work: a farmhouse sink positioned at the window instead of the island, and a floor-to-ceiling pantry wall that mixes hidden storage with lit, glass-front display. Neither one photographs as dramatically as a custom hood, but both get used every single day.

A Farmhouse Sink Earns Its Spot at the Window

This kitchen’s island holds the cooktop and seating, so the sink went to the window wall instead, a deep, apron-front farmhouse sink paired with a gooseneck faucet, set beneath a run of windows that looks out over the backyard. It’s a trade worth knowing about before layout gets locked in: an island sink puts whoever’s washing dishes facing into the room, while a window sink puts them facing outside, with better natural light falling directly onto the counter for the rest of the day. Our own guide on what a kitchen sink remodel actually involves covers the plumbing and countertop cutout work behind a change like this in more detail.

The Pantry Wall Doesn’t Hide Everything

Running floor to ceiling along one wall, this pantry does two jobs instead of one. The lower cabinets are solid-door storage for small appliances and everyday dishware, exactly what you’d expect from a pantry wall. The upper sections are different: glass-front doors with built-in interior lighting, holding serveware and decor meant to be seen rather than tucked away. It’s a small design decision with a real cost implication, the lighting has to be wired in during the framing stage, and the glass-front sections only look good if they’re kept curated rather than crammed, so it’s worth deciding up front which items in your own kitchen are worth putting on display.

Planning These Details Into Your Own Kitchen Remodel

Both of these details need to be decided earlier than most homeowners expect. A window-side sink means the window placement, plumbing rough-in, and countertop cutout all have to line up before framing is finished, moving a sink after the fact is a bigger job than swapping a faucet. A glass-front pantry wall means deciding on interior lighting and outlet placement during the same framing stage, not after the cabinets are installed. Getting both right at the design phase avoids a second round of electrical or plumbing work later.

Considering a Kitchen Remodel of Your Own?

The range hood usually gets the attention in a kitchen remodel, but the sink placement and the pantry wall are what you’ll actually use every day. At America’s Advantage Remodeling, we’ve been planning kitchen remodels in the greater Sacramento area since 2001, and we’re happy to walk through which details in your own kitchen are worth the extra planning. Reach out for a free in-home consultation.

Frequently Asked Questions

Q: Are glass-front cabinets impractical for everyday kitchen storage?

A: They work well when they’re used for the right things: dishware, glassware, and decor meant to be seen, rather than everyday pantry items, which is why most glass-front pantry walls pair open, lit upper cabinets with solid-door lower cabinets for the things you don’t want on display.

Q: What goes in a floor-to-ceiling pantry wall versus regular upper cabinets?

A: The lower, solid-door sections typically hold small appliances, bulk pantry goods, and everyday dishware, while the upper glass-front sections with interior lighting are reserved for serveware, glassware, and decor, splitting hidden storage from display storage within a single wall of cabinetry.

Q: Does a glass-front cabinet need to stay perfectly organized?

A: Yes, more than a solid-door cabinet, anything visible through the glass becomes part of the kitchen’s look, so glass-front sections work best reserved for a smaller, curated set of items rather than everyday clutter that a solid door would otherwise hide.

Q: What’s the benefit of a farmhouse sink over a standard undermount sink?

A: A farmhouse sink’s deep, wide basin and exposed apron front handle oversized pots and sheet pans more easily than a standard undermount sink, and its forward-set position lets it double as a design focal point at a window or feature wall.

Q: How much does floor-to-ceiling custom cabinetry add to a kitchen remodel budget?

A: It runs meaningfully higher than stock upper cabinets because of the added material, the built-in lighting wiring, and the custom height needed to reach the ceiling, so it’s worth deciding early in the design phase whether the extra storage and display space is worth that added cost versus a standard-height upper cabinet run.

Beyond Finished: The Basement Remodel Details That Make It Actually Get Used

Опубликовано: September 17, 2026 в 8:53 am

Автор:

Категории: All

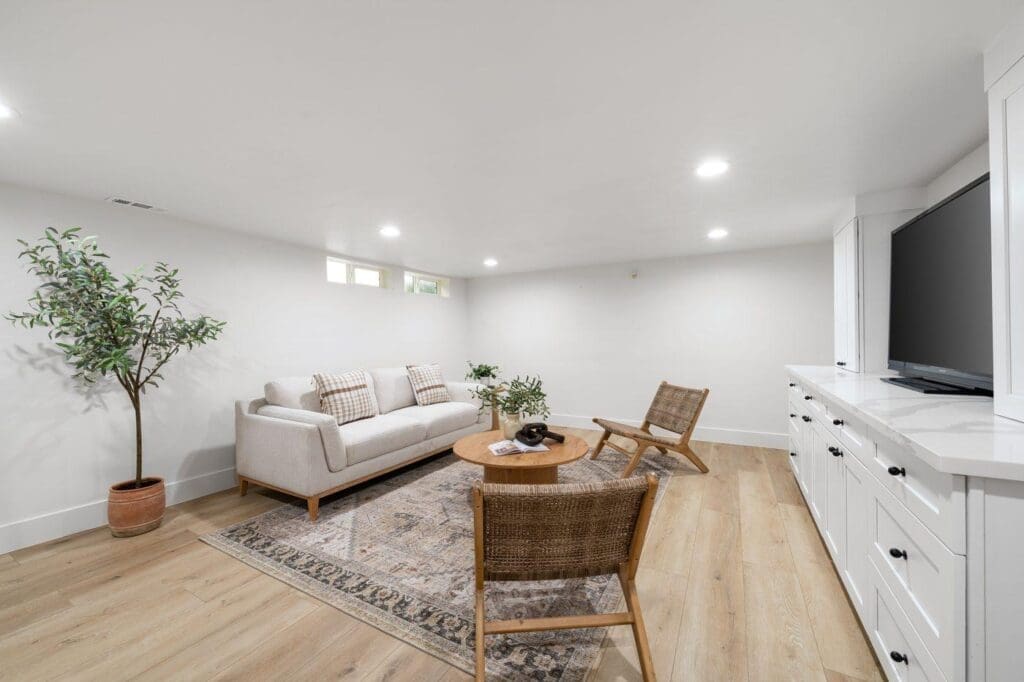
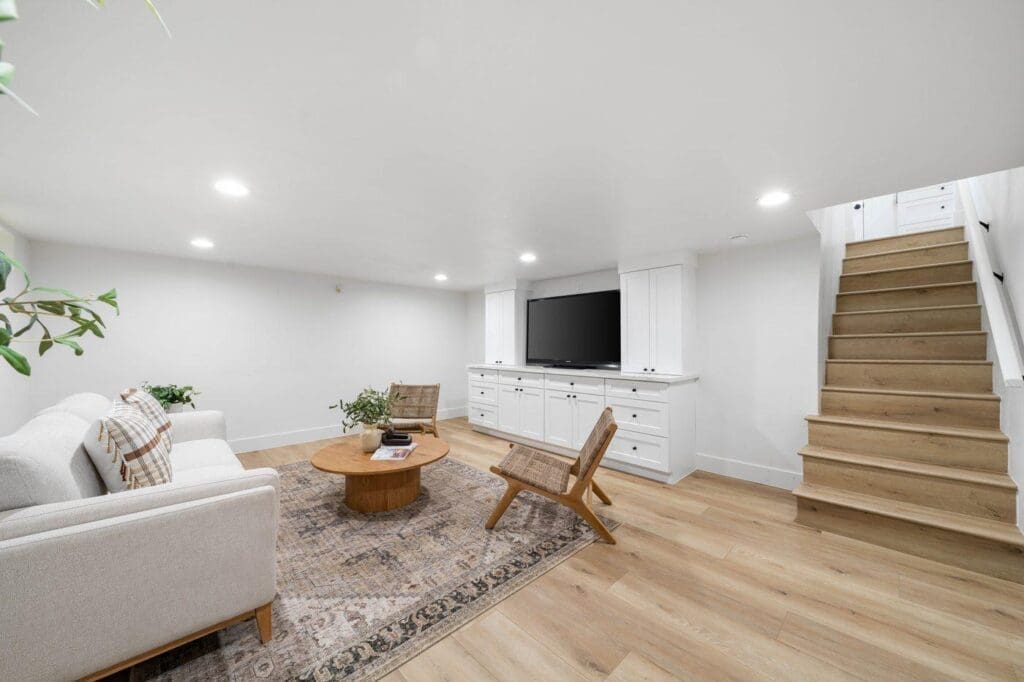
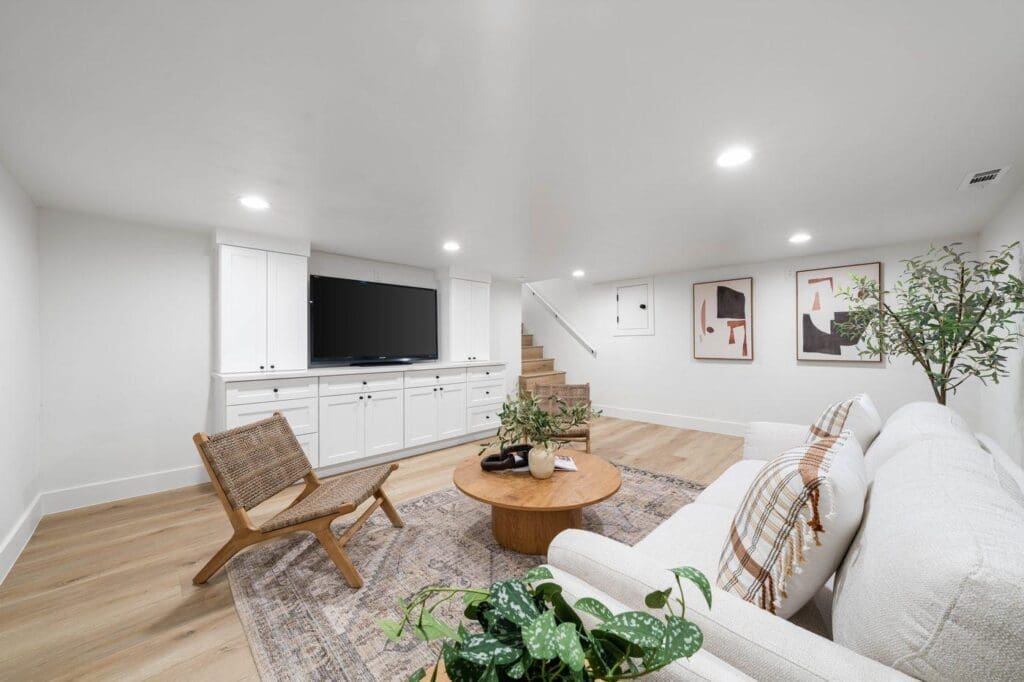
Finishing a basement usually means drywall, flooring, and enough lighting to legally call it a room, the baseline that turns unused square footage into livable space. But turning that square footage into a room people actually spend time in takes a few more deliberate choices. In this Land Park home remodel, three details do most of that work: a built-in cabinetry wall that keeps the media setup from looking like a dorm room, a staircase finished to match the space instead of feeling like an afterthought, and a seating layout built for more than one way of using the room. Here’s what each one does.

A Built-In Wall Beats a TV Stand

The media wall here is built-in, not furniture, with full-height white shaker-style cabinetry flanking the TV and a continuous quartz-topped counter running behind it. Every cord, cable box, and game console lives behind a door or in a drawer instead of stacked on open shelves around a freestanding stand, and the cabinetry’s style matches what’s upstairs, which is what keeps a basement from feeling like a separate, lesser space tacked onto the house. It’s a higher upfront cost than a TV stand from a furniture store, but it’s also not something you can easily add later without opening up a finished wall.

The Staircase Doesn’t Look Like an Afterthought

A lot of basement remodels finish the room and leave the stairs as bare, utility-grade steps, technically fine, but a visual seam between “the basement” and “the rest of the house.” Here, the stair treads are finished in the same wide-plank flooring used across the rest of the basement, so the stairs read as a continuation of the room instead of a hallway that happens to end in a nicer space. It’s a small material decision, but it has to be made early — swapping stair tread material after the flooring order is placed usually means a second, separate order and a mismatch risk that’s hard to fix after installation.

Seating That Works for More Than Movie Night

Instead of one large sectional locked into a single TV-facing arrangement, this basement uses a sofa paired with a couple of lighter, movable woven-wood accent chairs around a round coffee table. That mix means the seating can reconfigure, pulled in for a game night, pushed back for kids to spread out, or left as-is for watching TV, rather than committing the whole room to one layout. A patterned area rug anchors the grouping, and a few large potted plants soften what would otherwise be an all-white, windowless room.

Planning These Details Into Your Own Basement Remodel

Sequencing matters more here than it seems. Decide on stair tread material and built-in cabinetry dimensions before flooring and drywall are finalized, not after; both are far more disruptive to change once the room is closed up. Plan electrical for the media wall (outlets, low-voltage wiring for the TV and any equipment) into the framing stage rather than adding it later. And when you get to furniture, favor a mix of anchor and movable pieces over one large, fixed arrangement, especially in a basement that might need to flex between a media room, a playroom, and a guest hangout space over the years.

Considering a Home Remodel of Your Own?

The details that make a finished basement actually get used- built-ins that hide the clutter, a staircase that matches the room, furniture that flexes for more than one use- are easiest to get right when they’re planned alongside the layout, not added after the drywall goes up. At America’s Advantage Remodeling, we’ve been planning and building home remodels in the greater Sacramento area since 2001, and we’re happy to walk through what your basement or any other space in your home actually needs. Reach out for a free in-home consultation.

Frequently Asked Questions

Q: What makes a finished basement feel like real living space instead of just extra square footage?

A: Drywall, flooring, and lighting are what make a basement legally “finished,” but built-in cabinetry that hides media clutter, a staircase finished to match the room, and furniture arranged for more than one use are what make people actually want to spend time there instead of just knowing the square footage exists.

Q: Should basement stairs match the basement flooring or the upstairs flooring?

A: Matching the basement’s own flooring is usually the better call; it makes the staircase read as part of the finished room you’re arriving in, rather than a leftover utility stair that happens to end in a nicer space; matching the upstairs flooring instead tends to make the transition feel disconnected.

Q: Do I need built-in cabinetry in a finished basement?

A: It’s not required, but a built-in media wall solves a problem freestanding furniture doesn’t: it hides cords, components, and storage behind doors and drawers instead of leaving them stacked around a freestanding TV stand, which matters more in a basement than upstairs since there’s often no other storage room nearby.

Q: How should I light a basement with no natural light?

A: Layer the lighting rather than relying on one ceiling fixture; recessed cans spaced evenly across the ceiling for general light, plus lamps or accent lighting at seating height, does more to make a windowless room feel comfortable than a single bright source that leaves shadows and flat corners.

Q: What furniture works best in a multi-purpose basement room?

A: A mix of a sofa with a couple of lighter, movable accent chairs works better than one large sectional facing the TV; the movable pieces let the room reconfigure for a game night, a kids’ play area, or casual conversation, instead of locking the whole space into a single TV-watching layout.

Q: How much does finishing a basement typically add to a home’s usable space?

A: It depends entirely on the basement’s existing square footage and ceiling height, but the bigger cost driver is usually mechanicals, electrical for lighting and outlets, HVAC extension, and moisture control, rather than the cosmetic finishes, which is why it’s worth budgeting for those systems first rather than starting with furniture and paint colors.

Beyond the Island: The Kitchen Remodel Details That Do the Everyday Work

Опубликовано: September 15, 2026 в 8:36 am

Автор:

Категории: All

Ask most homeowners to describe their dream kitchen remodel and the island comes up first: waterfall edge, seating, a farmhouse sink built right in. It’s the obvious showpiece, and it usually earns the spot. But in this Elk Grove kitchen remodel, three details that never make it onto a mood board are doing just as much of the daily work: a second prep sink, a dedicated range wall, and a run of cabinetry hardware consistent enough to tie the whole room together. Here’s what those details actually do.

A Second Sink Changes How Two People Cook Together

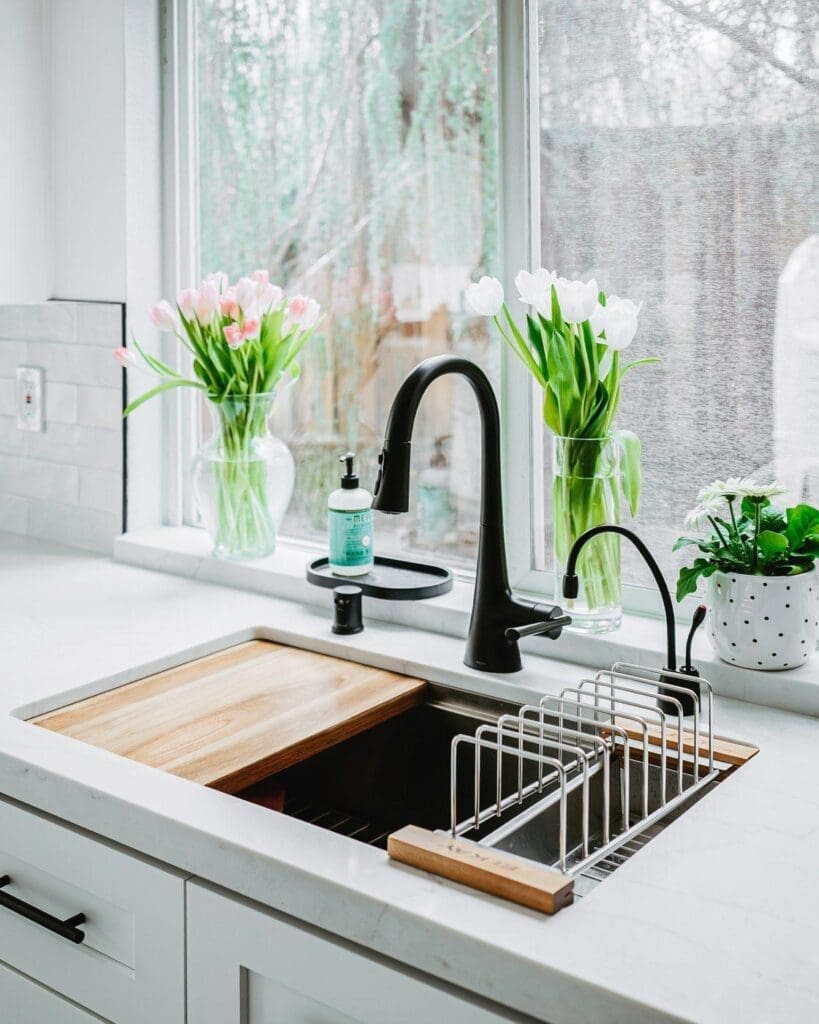
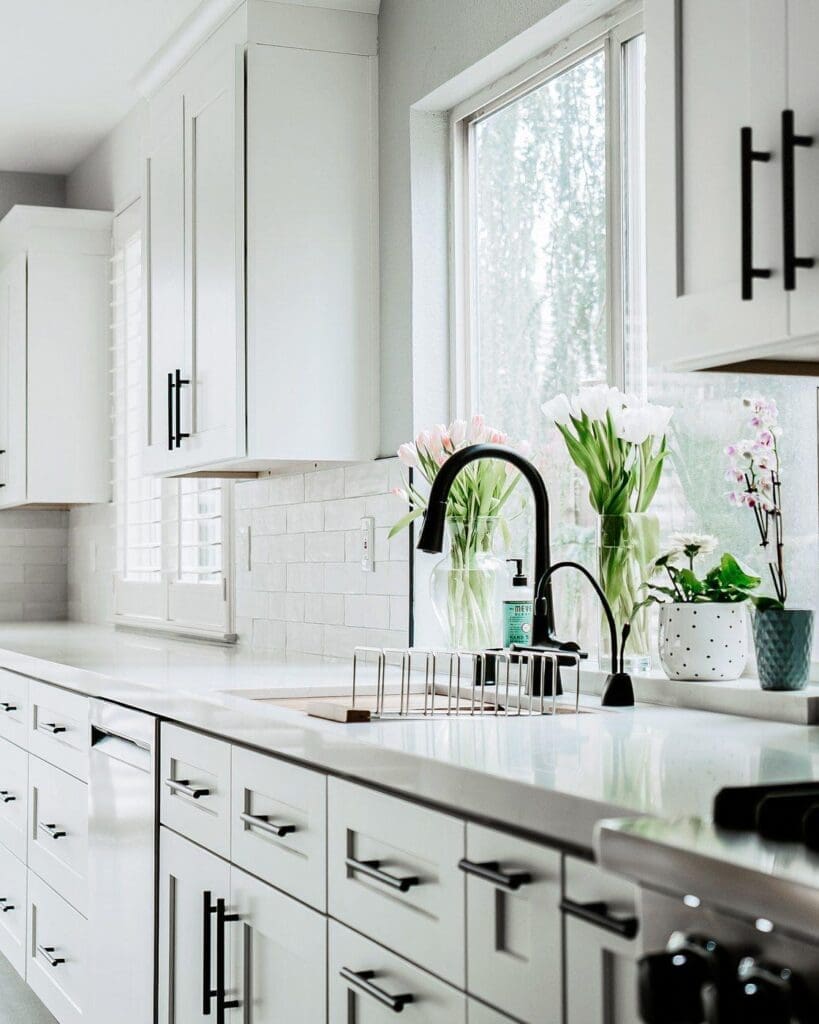
The island sink handles cleanup. This one, tucked under a window on the perimeter counter, is a genuine prep sink, with a built-in cutting board over the basin, its own matte black pull-down faucet, and a dish rack that lives right in it. In a kitchen this size, that second sink means one person can rinse produce or fill a stockpot at the window while someone else uses the island sink for dishes, without the two jobs colliding at a single fixture. It’s a detail that’s easy to skip in a smaller remodel, but in a kitchen built around real day-to-day cooking, it removes one of the most common bottlenecks in a shared kitchen.

The Range Wall Does More Than Hold the Stove

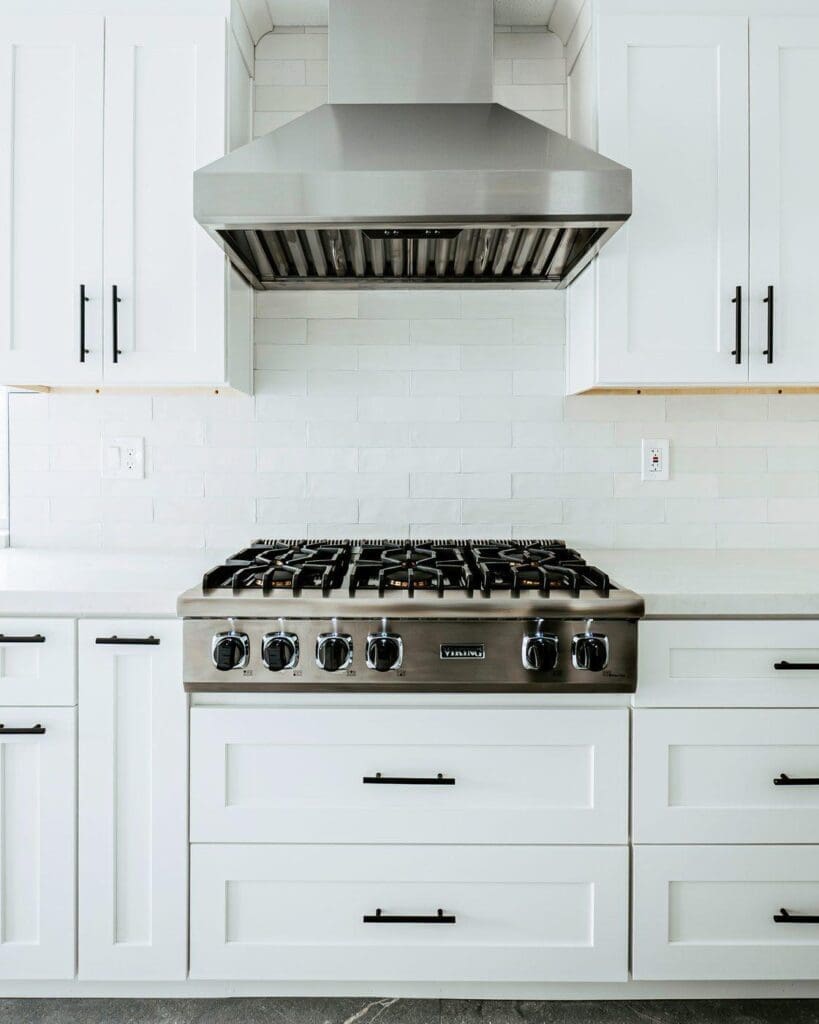
The range wall pairs a Viking gas rangetop with a full-size stainless steel hood and a white subway tile backsplash that runs floor-to-cabinet behind it, a combination chosen for function as much as looks. A hood sized and vented for a professional-style rangetop actually clears cooking heat and exhaust to the outside instead of just filtering it back into the room, and a tile backsplash that goes all the way up is far easier to wipe down than painted drywall after regular high-heat cooking. The matte black hardware on the flanking cabinets isn’t incidental either, it’s the same finish used throughout the kitchen, which is what keeps a hardworking wall like this one looking intentional rather than purely utilitarian.

Cabinetry Hardware Is the Detail That Ties a Big Kitchen Together

This kitchen has a long run of perimeter cabinetry, enough linear footage that inconsistent hardware would make it read as busy or disjointed rather than cohesive. Instead, the same matte black bar-pull hardware repeats on every drawer and door down the entire wall, matching the sink faucets and pendant lighting elsewhere in the room. It’s one of the least expensive decisions in a kitchen remodel, and one of the ones that does the most to make a large kitchen feel like a single, considered room instead of a row of individual cabinets.

Planning These Details Into Your Own Kitchen Remodel

The furniture and finish choices come last, the sequencing matters more than it seems. Decide early whether your layout has the plumbing access (or budget) for a second prep sink, since retrofitting one later usually means opening up cabinetry or a wall that’s already finished. Settle on range hood venting requirements before the surrounding cabinet layout is finalized, since a properly vented hood needs ductwork routed to the exterior. And pick a single hardware finish and pull style for the bulk of your cabinetry before you order it, reserving any hardware variation for one clearly distinct zone, like an island, rather than spreading it across the whole kitchen.

Considering a Kitchen Remodel of Your Own?

The details that make a kitchen work every day- a second sink, a properly vented range wall, hardware that ties a big room together- are easiest to get right when they’re planned alongside the layout, not added as an afterthought once the cabinets are already ordered. At America’s Advantage Remodeling, we’ve been planning and building kitchen remodels in the greater Sacramento area since 2001, and we’re happy to walk through what your kitchen actually needs before you start choosing finishes. Reach out for a free in-home consultation.

Frequently Asked Questions

Q: Do I need a second sink in my kitchen remodel?

A: Not every kitchen needs one, but if your kitchen sees two people cooking at once, a second prep sink on the perimeter counter lets one person rinse produce or fill a pot while someone else uses the main sink for cleanup, without the two jobs competing for the same fixture.

Q: What’s the difference between a prep sink and a bar sink?

A: A prep sink is sized and plumbed for food prep, rinsing, filling pots, staging ingredients- and is usually placed on the perimeter counter near where food actually gets worked. A bar sink is smaller and typically placed near a beverage or wine fridge for drinks, not food prep, so the two serve different parts of the kitchen even though they can look similar.

Q: Does a range hood need to be vented to the outside?

A: For a gas rangetop like the one in this remodel, yes, a properly vented hood routes cooking exhaust, heat, and grease outside rather than just filtering and recirculating it back into the room, which matters more with higher-output professional-style ranges than it does with a standard electric cooktop.

Q: Should cabinet hardware match throughout the kitchen?

A: In a kitchen with a long run of cabinetry, matching hardware finish and pull style is what keeps that much cabinetry from reading as visually busy; it’s a small, inexpensive detail that does a lot of the work of making a large kitchen feel like one cohesive room instead of a row of individual cabinets.

Q: How much does adding a second sink cost during a kitchen remodel?

A: Cost depends mainly on plumbing access; if the new sink location is near existing supply and drain lines, it’s a relatively modest addition; if it requires running new plumbing through cabinetry or a wall, the cost goes up accordingly, which is why it’s worth deciding on a second sink before the layout and cabinetry are finalized, not after.

Q: Can I mix cabinet pull styles in one kitchen?

A: You can, but it’s a deliberate design choice best reserved for distinguishing one specific zone, like an island, from the rest of the kitchen; for the main perimeter cabinetry, one consistent pull style and finish is what makes a large run of cabinets read as intentional rather than mismatched.

A Fireplace at the Table: Why This Open-Concept Remodel Put the Hearth in the Dining Zone, Not Just the Living Room

Опубликовано: September 15, 2026 в 8:32 am

Автор:

Категории: All

Most remodels treat the fireplace as a living-room fixture and the dining table as something that happens somewhere else. A recent Sacramento-area open-concept remodel didn’t split the two apart: the fireplace sits on the same wall the round dining table faces, so the space anchoring the room’s biggest gathering spot is the one everybody actually spends time at, not just whoever’s on the sofa. Here’s why that placement works, and what it takes to plan a layout like it.

One Hearth, Three Zones

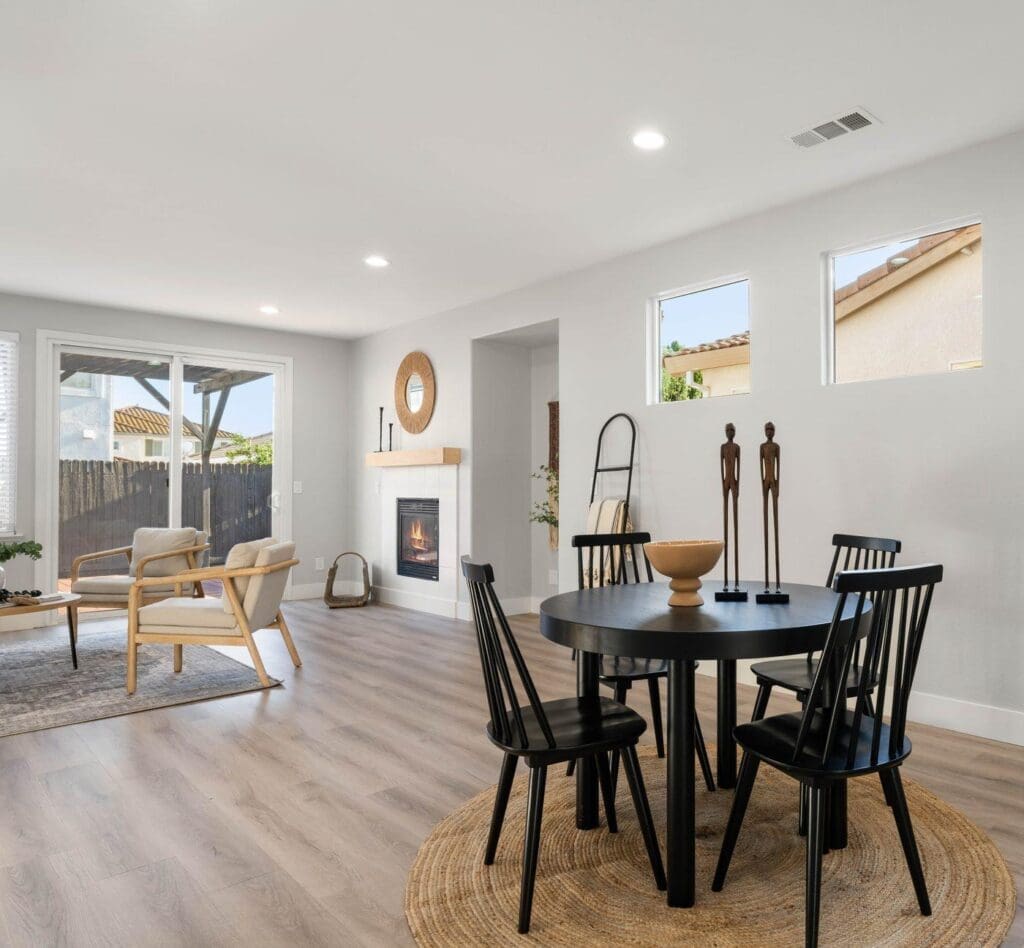
In a fully open floor plan, the kitchen island, the dining table, and the living room seating all share the same sightlines; there’s no wall forcing a choice about which room gets the fireplace. This remodel put it on the wall the dining table faces, with a round mirror above the mantel to keep the eye moving rather than treating the fireplace as a dead-end feature. The result is a fireplace that reads as part of the whole space, not a living-room-only amenity the dining side of the house just happens to glimpse.

Why the Dining Table Got the Better Seat

The table itself matters here: it’s round, not rectangular, which means there’s no head-of-table seat facing directly away from the fire. Every chair has roughly the same sightline to the hearth, so the fireplace benefits the whole table rather than the one or two seats that happen to face the right direction. A long rectangular table pushed against the same wall would have left the far-end seats with their backs to it, a small detail, but it’s the kind of furniture-and-layout decision that either makes a shared fireplace zone feel intentional or makes it feel like an afterthought.

Planning This Layout in Your Own Remodel

The bigger constraint isn’t the furniture; it’s the mechanicals: repositioning a fireplace to serve a different zone usually means running new gas supply and, for a vented unit, new venting to the exterior, a real scope item, not a cosmetic tweak. It’s worth confirming that mechanical path with your contractor early, before the furniture layout or dining table shape gets locked in around a fireplace location that isn’t actually feasible to build. Once the fireplace’s wall is confirmed, the furniture choices, table shape, seating orientation, and rug placement are what turn a shared sightline into a space that actually feels anchored by it.

Considering an Open-Concept Remodel of Your Own?

Decisions like where a fireplace goes are easiest to get right when the whole open-concept space- kitchen, dining, and living- is planned together, instead of treating each zone as its own separate project. At America’s Advantage Remodeling, we’ve been planning and building open-concept remodels in the greater Sacramento area since 2001, and we’re happy to walk through your layout with you to figure out what’s actually feasible before you fall in love with a specific furniture plan. Reach out for a free in-home consultation.

Frequently Asked Questions

Q: Does a fireplace have to be in the living room?

A: No, a fireplace only has to sit wherever it can be vented and gas-lined safely, and in an open floor plan that’s often more than one zone. Placing it along the wall shared by the dining and living areas lets both spaces use it, instead of confining the fireplace’s warmth and focal point to whichever room happens to hold the sofa.

Q: Why place a fireplace near the dining table instead of only the sofa?

A: In an open-concept layout, the dining table is often used just as long, or longer, than the living room seating, for meals, homework, and everyday sitting, not just formal dinners. Putting the fireplace where the dining table can see it means that everyday use gets the ambiance too, rather than reserving it for whoever is on the couch.

Q: Does a shared great-room fireplace heat the whole space evenly?

A: A single gas fireplace won’t heat a large open-concept space evenly on its own; it’s primarily a focal point and supplemental warmth for whichever zone is closest, with central HVAC handling the rest of the room. The value of a central, shared placement is sightline and ambiance across multiple zones, not whole-room heating performance.

Q: What should you plan for before repositioning a fireplace during a remodel?

A: The gas line and vent routing are the real constraints; moving a fireplace to a new wall usually means running new gas supply and, for a vented unit, new venting to the exterior, which is a bigger scope item than most cosmetic changes in a remodel. It’s worth confirming the mechanical feasibility and cost with your contractor before committing to a specific wall.
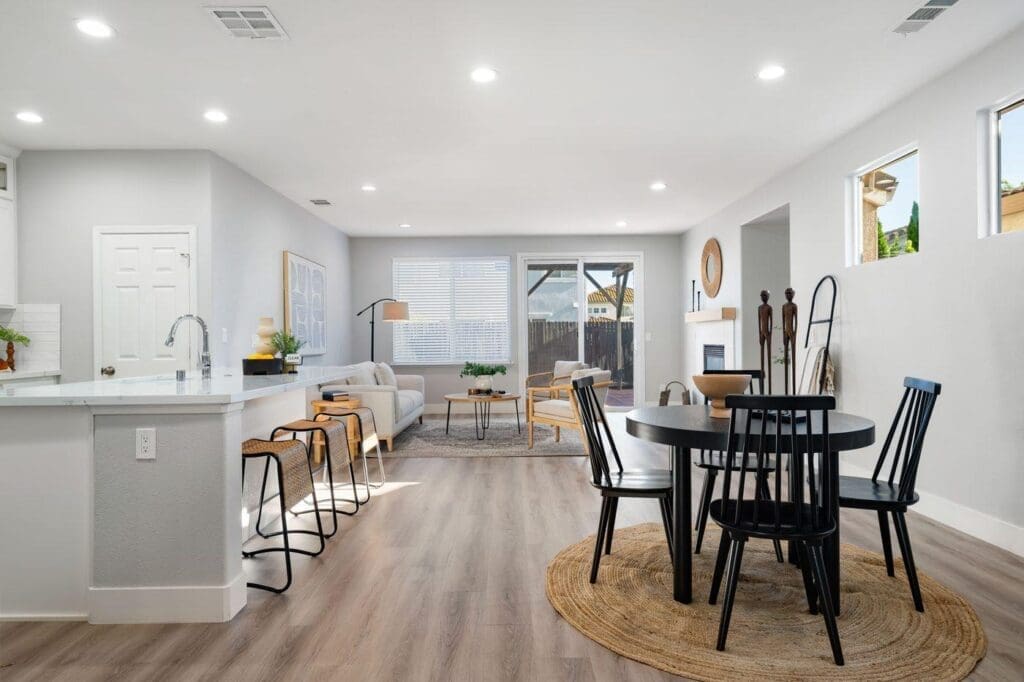
Q: Does this layout work with a round dining table specifically?

A: Yes, and it often works better than a rectangular table would in the same spot. A round table has no head-of-table seat facing away from the fireplace, so everyone at it gets roughly the same sightline to the hearth. A long rectangular table pushed against the same wall would leave the seats at either end with very different views of the fire.

Q: Is a shared fireplace zone better for entertaining than a separate living and dining split?

A: For entertaining, yes, a shared zone lets guests circulate between the kitchen island, the dining table, and the seating area without the fireplace being tucked away in a room some guests never enter. A fully separated living and dining layout can still work well for entertaining, but it naturally splits the group into two rooms instead of one continuous space.

Dining Nook Design Done Right: What This Land Park Remodel Got Right in a Small Corner

Опубликовано: September 15, 2026 в 8:27 am

Автор:

Категории: All

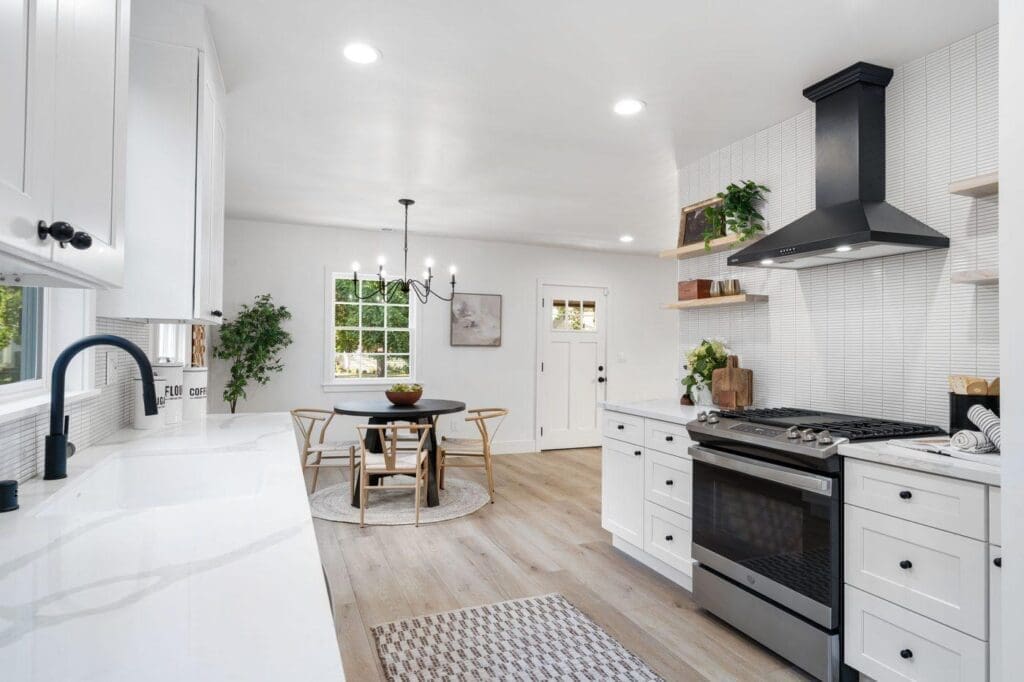
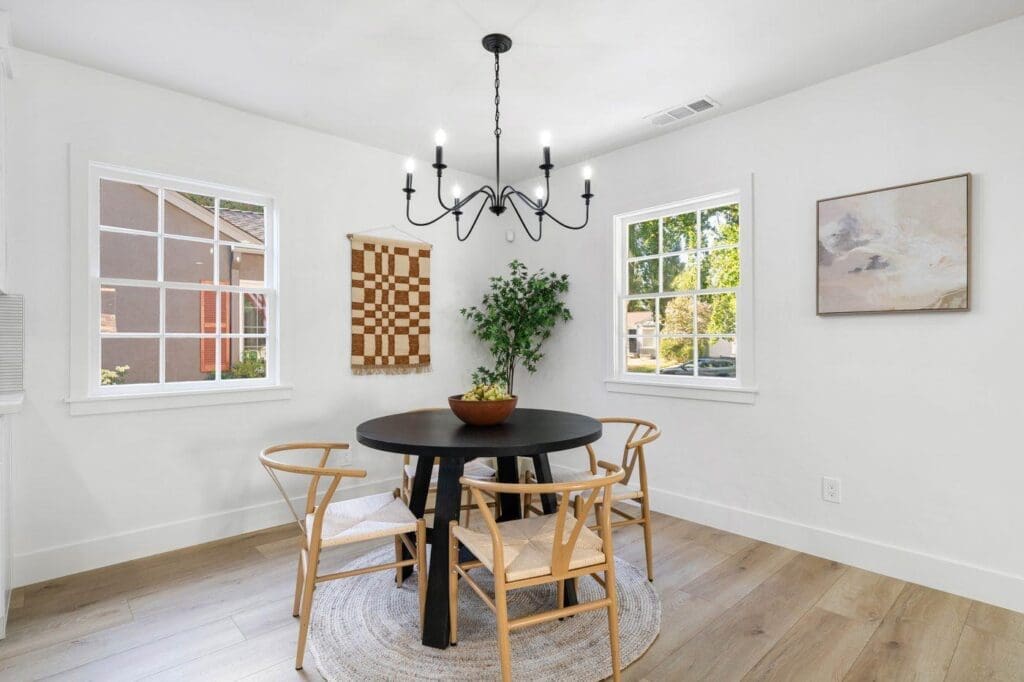
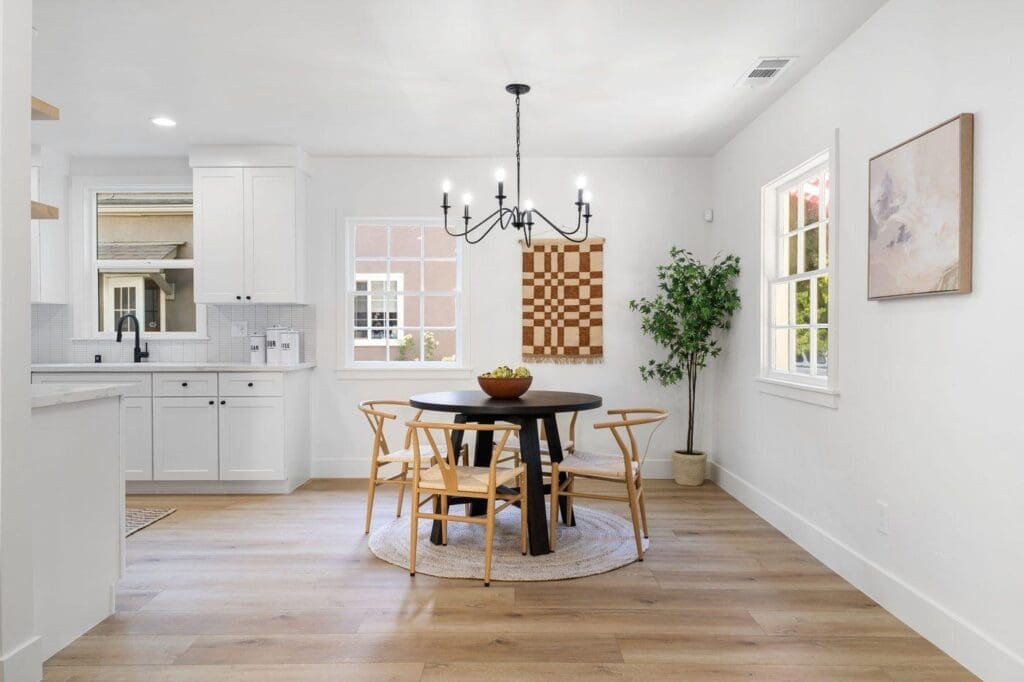
Walk to the far side of the kitchen in this recent Land Park remodel, and the dining nook is already in view, a round black table and a black chandelier framed past the range hood and floating shelves, pulling your eye straight through the open-concept layout. That sightline is no accident. Not every kitchen remodel needs a full, separately furnished dining room; sometimes the better answer is a well-placed corner that does the job just as well, and stays visible from everywhere else in the room. It’s a small space, but it does a lot of work. Here’s what made it come together.

More Than a Table in a Corner

The furniture here is doing real design work, not just filling space: a round black table with no sharp corners to navigate around, wishbone chairs in natural wood with woven seats to keep the look from feeling too heavy, and a black wrought-iron chandelier overhead that echoes the table’s finish. A woven checkerboard textile on the wall and a potted tree add texture without competing with the furniture. None of it is expensive or hard to source, it’s a considered pairing, not a custom build, which is exactly why it’s easy to replicate.

Open to the Kitchen, Not Closed Off From It

The nook sits at the edge of the kitchen with no wall separating the two spaces, just a change in flooring pattern and a round jute rug to visually anchor the table. That’s the real difference between a dining nook and a dining room: the nook doesn’t pretend to be a separate room. Whoever’s cooking can talk to whoever’s at the table, and the chandelier’s light reaches just far enough to define the dining zone without needing a wall to do it. That’s the same open sightline that makes the nook visible from clear across the kitchen in the first place.

Ready to Rethink Your Own Kitchen or Dining Layout?

A dining nook is one of those details that works best when it’s planned alongside the kitchen, not added as an afterthought once the bigger layout decisions are already locked in. At America’s Advantage Remodeling, we’ve been designing kitchens and living spaces in the greater Sacramento area since 2001, and we’re happy to walk through your space with you and figure out whether a dining nook or a more traditional dining room fits how your household actually eats and gathers. Reach out for a free in-home consultation.

Frequently Asked Questions

Q: What is a dining nook, and how is it different from a dining room?

A: A dining nook is a smaller, more casual dining space, usually a table and a few chairs tucked into a corner or bay of windows near the kitchen, rather than a separate, formally furnished dining room. It typically shares open sightlines with the kitchen and living space instead of being closed off, which makes it feel like part of the everyday flow of the house rather than a room reserved for special occasions.

Q: Can a dining nook replace a full dining room?

A: For a lot of households, yes, a well-placed dining nook with a table that seats 4 to 6 handles daily meals and casual entertaining just as well as a formal dining room, especially in a home that already has an open-concept kitchen and living area. A separate formal dining room still makes sense for households that regularly host larger sit-down gatherings, but it’s no longer a given that every remodel needs one.

Q: Where should a dining nook be placed relative to the kitchen?

A: A dining nook works best directly adjacent to the kitchen, ideally within a few steps of the stove and sink, so food and dishes don’t have to travel far. Placing it near a window or a corner with natural light also helps it feel like its own defined space even when it’s fully open to the kitchen and living room around it.

Q: Do I need a built-in banquette for a dining nook, or does a regular table work?

A: A built-in banquette isn’t required; a freestanding table and chairs work perfectly well in a dining nook and are easier to reconfigure or replace later than a built-in bench. A banquette makes sense when floor space is especially tight, and the built-in seating can save a few extra square feet, but it’s a space-saving choice, not a requirement for the nook to function.

Q: What makes a small dining nook feel bigger than it is?

A: Windows on two sides of a small dining nook make the biggest difference, since natural light and a view out make the space feel open even at a compact footprint. A round table also helps in a tight nook, since it has no sharp corners to navigate around, and keeping the space visually open to the adjoining kitchen and living room (rather than walling it off) keeps it from feeling boxed in.

Q: How big of a table fits in a dining nook?

A: Most dining nooks comfortably fit a round or oval table seating 4 to 6, roughly 42 to 54 inches in diameter, depending on the corner’s exact dimensions and how much clearance is needed for chairs to slide out. Measuring the available floor space (including at least 36 inches of clearance behind each chair) before choosing a table size prevents the nook from feeling cramped once it’s furnished.