What Countertop Materials Should I Consider for My Kitchen?

What Countertop Materials Should I Consider for My Kitchen?
Choosing the right kitchen countertops is one of the most important decisions you will make during a kitchen remodel. Homeowners often ask, what countertop materials should I consider for my kitchen, especially when balancing durability, style, maintenance, and cost. Your countertops quickly become a focal point of the space, supporting daily food prep, hosting hot pots and hot pans, and contributing to the overall look of your dream kitchen. With so many kitchen countertop materials available in 2025, understanding the differences between countertop options is essential. This guide walks through the most popular and practical countertop materials, explains how they perform in real homes, and helps you select a great countertop material that fits your lifestyle and long term goals.
Why Choosing the Right Kitchen Countertops Matters
Kitchen counters are not just decorative surfaces. They must be extremely durable, heat resistant, stain resistant, and easy to maintain. The right countertops can increase home value, support everyday cooking habits, and reduce maintenance requirements over time. Poor material choices can lead to visible seams, easily scratched surfaces, or high maintenance routines that homeowners regret later. Because countertops are measured and priced per square foot, mistakes can also be costly. Selecting the best countertops means considering how your family uses the kitchen, your preferred kitchen styles, and how much regular maintenance you are willing to handle.
7 Best Kitchen Countertop Materials to Consider in 2025
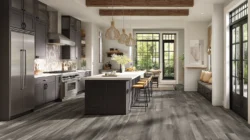
Quartz Countertops and Engineered Stone
Quartz countertops remain one of the most popular countertop materials on the market. Made from engineered stone using quartz pieces and binding resins, quartz offers a non porous surface that is bacteria resistant and naturally resistant to most stains. Because quartz countertops are manufactured, they provide consistent color, subtle veining, and design flexibility for modern kitchens.
Quartz is highly durable and scratch resistant, making it a low maintenance option for busy households. Unlike natural stone countertops, quartz does not require sealing. Cleaning is simple with mild soap and water, and harsh chemicals are not recommended. While quartz is not completely heat resistant, using hot pads under hot pots is advised to protect the surface.
Per square foot, quartz countertops typically fall into a mid to high price range, but many homeowners consider them cost effective due to their long lifespan and minimal regular maintenance.
Granite Countertops and Natural Stone
Granite countertops are a classic choice and remain one of the best countertops for homeowners who value natural beauty. As a type of natural stone, granite offers unique patterns, depth, and character that cannot be replicated. No two granite slabs are the same, which appeals to homeowners who want custom countertops with a one of a kind look.
Granite is extremely durable, highly durable, and offers excellent heat resistance. Hot pans can usually be placed directly on granite without damage, making it ideal for serious cooking and food prep. Granite countertops are also scratch resistant, but they do require sealing. Properly sealed granite helps prevent moisture absorption and protects against most stains.
Granite does require regular maintenance compared to engineered stone, but many homeowners feel the timeless elegance and boost to home value make it worthwhile. Granite per square foot pricing varies widely depending on color and availability.
Marble Countertops and Timeless Elegance
Marble countertops are known for their timeless elegance and soft, natural beauty. Marble is a natural stone that has been used for centuries and continues to be popular in luxury kitchen styles. Its subtle veining and light reflective qualities make it a stunning focal point.
However, marble countertops are considered high maintenance compared to other countertop materials. Marble is porous and can be easily scratched. It can stain if spills are not cleaned quickly, even when properly sealed. Marble is also sensitive to acidic foods, which can etch the surface during food prep.
Because of these factors, marble countertops are best suited for homeowners who prioritize appearance over durability or who use marble in lower traffic areas such as islands or baking stations. Per square foot costs are typically higher than granite, reflecting its premium status.
Butcher Block Countertops and Wood Surfaces
Butcher block countertops add warmth and rustic charm to kitchens. Made from wood, these countertops offer a rustic aesthetic that works well in farmhouse, traditional, and transitional kitchen styles. Butcher block is often considered budget friendly compared to stone surfaces.
Wood countertops are softer than stone and can be easily scratched, but many homeowners appreciate that scratches can be sanded out. Regular oiling is required to protect the surface, especially in wet areas near sinks. Butcher block countertops should always be used with a cutting board to prevent damage and bacteria buildup.
While butcher block is not naturally resistant to heat, using hot pads is necessary to avoid burns or warping. For homeowners who enjoy a hands on approach and love natural materials, butcher block can be a great countertop material that adds character and warmth.
Laminate Countertops and Cost Effective Solutions
Laminate countertops have improved significantly in recent years and remain a cost effective option for many homeowners. These countertops are manufactured with layers of plastic bonded to particleboard, offering a wide range of colors and patterns that mimic other countertop materials.
Laminate countertops are budget friendly and easy to clean with mild soap. They are stain resistant but not heat resistant, so hot pans and hot pots can cause damage. Laminate is also more prone to visible seams and can be easily scratched compared to stone or engineered stone.
While laminate may not increase home value as much as other countertop materials, it can be a practical solution for homeowners seeking new countertops on a tight budget.
Tile Countertops and Porcelain Options
Tile countertops, including ceramic and porcelain tile countertops, provide flexibility in design and color. These kitchen countertop options are heat resistant and stain resistant, making them suitable for cooking spaces.
One drawback of tile countertops is grout lines. Grout lines can collect dirt and require regular cleaning and sealing. Over time, grout may discolor, which increases maintenance requirements. Tile surfaces can also feel uneven during food prep.
Despite these challenges, tile countertops remain a viable option for homeowners who enjoy creative patterns and want durable surfaces at a moderate square foot cost.
Solid Surface Countertops and Other Countertop Materials
Solid surface countertops are manufactured materials designed to offer a seamless look. A solid surface countertop is non porous, bacteria resistant, and easy to repair if scratched. These countertops provide a smooth appearance with minimal visible seams.
Solid surface is considered a low maintenance option and is often used in modern kitchens. However, it is not as heat resistant as granite or quartz, so hot pads should always be used. Solid surface countertops are moderately priced per square foot and are popular for homeowners who want a clean, uniform appearance.
Other countertop materials include stainless steel and soapstone countertops. Stainless steel is heat resistant, non porous, and commonly used in professional kitchens. Soapstone countertops are a type of natural stone known for their natural beauty, softness, and ability to darken over time.
How to Choose the Right Countertop for Your Kitchen
Lifestyle and Daily Use
Your lifestyle should be the top priority when choosing kitchen countertop materials. If you cook frequently and use hot pots, granite countertops or stainless steel may be ideal. For families with kids, stain resistant and scratch resistant surfaces like quartz countertops are often the best choice.
Maintenance Requirements
Consider how much regular maintenance you are willing to perform. Natural stone countertops often require sealing and careful cleaning. Engineered stone and solid surface options typically offer lower maintenance and easier care with mild soap.
Design and Kitchen Styles
Countertops should complement cabinets, flooring, and backsplashes. Wood and butcher block add warmth and suit rustic charm. Marble and quartzite align with classic and luxury kitchen styles. Quartz and solid surface work well in modern kitchens.
Budget and Cost Per Square Foot
Countertop materials vary significantly in cost per square foot. Laminate and butcher block are generally more budget friendly. Granite, quartz, and marble range higher but often provide better durability and long term value.
Countertop Trends for 2025
In 2025, homeowners are gravitating toward durable surfaces that balance style and function. Quartz countertops continue to dominate due to their low maintenance appeal. Natural stone remains popular for its authenticity and natural beauty. Decorative edges such as a beveled edge and other decorative edges are being used to elevate custom countertops. Mixed materials, such as combining wood islands with stone perimeter countertops, are also trending.
Common Countertop Mistakes to Avoid
Many homeowners choose countertops based solely on appearance without considering heat resistance or daily use. Others underestimate maintenance requirements or fail to plan for sealing needs. Choosing the wrong countertop materials can result in high maintenance surfaces or damage from hot pans and wet areas. Professional installation is critical to avoid visible seams and structural issues.
FAQs About Kitchen Countertop Materials
What are the best countertops for durability?
Quartz countertops and granite countertops are considered extremely durable and suitable for heavy use.
Which countertop materials are the lowest maintenance?
Quartz, solid surface, and stainless steel are among the lowest maintenance options.
Are natural stone countertops worth it?
Natural stone countertops like granite and marble add home value and natural beauty, but they do require sealing and regular maintenance.
Can I mix different countertop materials in one kitchen?
Yes, combining different countertop materials can enhance functionality and design, such as using butcher block for food prep and stone for durability.
How much do kitchen countertops cost per square foot?
Costs vary widely, but laminate is typically the most cost effective, while marble and quartzite are higher per square foot investments.
Final Thoughts on Choosing Kitchen Countertops
Selecting the right kitchen countertops is about finding balance. You want a durable surface that fits your cooking habits, enhances your kitchen styles, and supports your long term goals. Whether you choose engineered stone, natural stone, wood, or other countertop materials, thoughtful planning will help you achieve a dream kitchen that performs as beautifully as it looks. New countertops are an investment, and choosing wisely ensures years of enjoyment, functionality, and lasting value.