How to Clean Kitchen Cabinets the Right Way
Cleaning kitchen cabinets may not be the most exciting task on your to-do list, but it plays a big role in keeping your kitchen looking polished, functional, and well-maintained. Whether your cabinets are brand new or decades old, understanding how to clean kitchen cabinets the right way helps preserve their finish, prevent long-term damage, and extend their life.
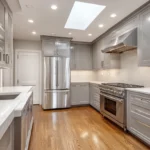
At America’s Advantage Remodeling, we’ve worked on hundreds of kitchens across Southern Indiana. From full remodels to cabinet refacing, one thing is always true: clean kitchen cabinets make a huge difference. This guide walks you through the exact steps to keep your kitchen cabinets in top shape, no matter the material or finish.
Why It’s Important to Clean Kitchen Cabinets Regularly
Dirty Cabinets Lead to Long-Term Damage
Kitchen cabinets are exposed to grease, food splatters, dust, and moisture almost daily. Without regular maintenance, these elements build up, causing stains, discoloration, and surface breakdown. Left too long, you could end up dealing with sticky finishes, warped wood, or peeling paint.
Cleaning Preserves Your Investment
Remodeling a kitchen is a major investment. Taking care of your cabinets with regular cleaning helps maintain their beauty and value. Even older cabinets can continue performing well with the right cleaning routine.
Cabinets Collect More Than You Think
Grease particles from cooking mix with airborne dust and settle on cabinet surfaces. If you’re not cleaning cabinets consistently, the buildup gets harder to remove. That’s when you’ll need more elbow grease, stronger cleaning solutions, or even a full cabinet refresh.
Know Your Cabinets Before You Clean
Different materials require different care. Understanding your cabinet type helps you avoid damaging surfaces while still removing dirt and grime effectively.
Wood Cabinets
Wood cabinets, including those with stained or sealed finishes, need gentle handling. Use a soft cloth with warm water and a few drops of dish soap. Never soak wood surfaces or let water sit. After wiping, always dry completely to avoid warping.
Painted Surfaces
Painted cabinets are vulnerable to chipping and dulling, especially if you use the wrong cleaner. Avoid harsh chemical cleaners or scrubbing pads. A mild solution of warm water and dish soap applied with a microfiber cloth is best. For spot cleaning, a clean magic eraser can help, but test it in a hidden area first.
Laminate or Thermofoil
These cabinets are easier to clean but sensitive to heat and moisture. Stick with a damp cloth and a few drops of dish soap. Avoid steam cleaners and abrasive sponges. Never place heat-producing appliances like toasters or ovens directly underneath these cabinets.
Glass Cabinet Doors
Use a glass-safe cleaner or a vinegar and warm water mix to remove fingerprints and smudges. Spray the cleaner onto a cloth, not directly onto the glass. Don’t forget to clean the frames and hinges while you’re at it.
Supplies You’ll Need to Clean Kitchen Cabinets

- Microfiber cloths
- Soft cloths or rags
- Mild dish soap
- Warm water
- Spray bottle
- Sponge
- Baking soda
- Small bowl
- Toothbrush or soft brush
- Optional: orange oil, citrus-based wood polish, vinegar
These simple tools will make quick work of even the dirtiest cabinets.
Daily and Weekly Maintenance for Kitchen Cabinets
Daily Spot Cleaning
Wipe up any splatters, spills, or sticky spots right away using a soft cloth and warm water. This prevents grease buildup and reduces the need for heavy scrubbing later.
Weekly Routine Cleaning
At least once a week, clean the exterior of all cabinet doors and drawer fronts. Focus on areas around knobs, drawer pulls, and under the hood where grease collects. Spray a mild solution onto a cloth or sponge and wipe all cabinet surfaces. Don’t forget to rinse and dry completely.
How to Deep Clean Kitchen Cabinets
Every few months, take time for a deep cleaning session. This prevents buildup from damaging finishes and helps your kitchen feel fresh.
Step 1: Empty Cabinets and Drawers
Remove all items, including liners, from inside your cabinets and drawers. This allows you to clean all interior surfaces without obstruction.
Step 2: Vacuum and Dust Interior Surfaces
Use a handheld vacuum or soft cloth to remove crumbs and dust from cabinet surfaces. Pay special attention to corners and shelf joints.
Step 3: Mix a Mild Cleaning Solution
In a bowl or spray bottle, combine warm water with a few drops of mild dish soap. Avoid harsh chemicals, which can damage wood and painted finishes.
Step 4: Wipe Interior and Exterior Surfaces
Use a microfiber cloth or sponge dampened with your cleaning solution to wipe down the interior and exterior of the cabinets. For wood cabinets or painted surfaces, don’t let the cloth get too wet. Gently scrub with a soft sponge on stuck on grime.
Step 5: Spot Clean Problem Areas
For tough stains or grease buildup, apply a paste of baking soda and warm water with a toothbrush or soft cloth. Gently scrub the surface, then wipe clean with a damp cloth. Rinse the cloth frequently as you work.
Step 6: Clean Handles, Knobs, and Drawer Pulls
Use a damp cloth and dish soap to wipe these high-touch areas. For tough grime, a toothbrush can help loosen gunk in crevices. Rinse and dry thoroughly.
Step 7: Dry Completely
Use a dry microfiber cloth to wipe down all cabinet surfaces, making sure no moisture is left behind. This step is especially important for wood cabinets and drawers.
Natural and DIY Cleaning Solutions for Kitchen Cabinets

Many homeowners prefer non-toxic or homemade cleaners. Here are a few safe and effective options.
Vinegar and Water
Mix equal parts vinegar and warm water in a spray bottle. Spray onto a cloth, then wipe cabinet surfaces. Great for laminate and painted finishes, but avoid using vinegar on raw wood.
Baking Soda Paste
Mix baking soda with a little water to create a paste. Apply to greasy spots or sticky residue and gently scrub. This method is especially effective on dirty cabinets around the stove.
Citrus-Based Cleaners
Orange oil or citrus-based cleaners add a fresh scent and cut through grease naturally. These are safe for many painted surfaces and wood doors, but always test first.
Olive Oil and Lemon Polish
For a natural wood conditioner, mix olive oil with lemon juice. Rub onto cabinet doors using a soft cloth, then buff dry. This leaves wood cabinets looking polished and helps resist dust.
Mistakes to Avoid When Cleaning Cabinets
- Using a magic eraser on painted cabinets without testing
- Spraying cleaner directly onto surfaces instead of using a cloth
- Letting water or cleaner sit on the cabinet door or drawer
- Using harsh chemical cleaners like bleach or ammonia
- Forgetting to clean the hardware or hinges
- Skipping the dry step after wiping
These mistakes can damage your finish, encourage mildew, or make your cabinets look older than they are.
Preventative Tips for Cleaner Cabinets
Always Use a Range Hood While Cooking
This reduces grease and steam from settling on cabinets, especially above the stove and oven.
Avoid Storing Heat-Producing Appliances Beneath Cabinets
Thermofoil and laminate cabinet doors can peel or warp when exposed to excess heat. Leave clearance around these appliances.
Wipe Spills Immediately
Grease, sauces, and liquids can seep into wood grain or discolor painted surfaces. Wipe quickly to prevent stains.
Use Liners Inside Cabinets and Drawers
Shelf liners make cleanup easier and protect the surface from food spills, cans, and pans.
Perform Regular Maintenance
Set a calendar reminder for deep cleaning every 3 to 6 months. Weekly wiping and monthly drawer cleanouts go a long way.
When Cleaning Isn’t Enough

There may come a time when no amount of scrubbing restores the beauty of your cabinets. Signs that you may need more than cleaning include:
- Peeling laminate or thermofoil
- Chipped or cracked cabinet doors
- Sticky finishes that never fully dry
- Drawers that stick or wobble
- Wood doors showing signs of rot or moisture damage
In these cases, a professional cabinet refacing or full remodel can breathe new life into your kitchen.
Frequently Asked Questions (FAQs) About Cleaning Kitchen Cabinets
How often should I clean my kitchen cabinets?
For regular maintenance, wipe down your cabinet surfaces at least once a week to prevent grease buildup and stains. Deep cleaning is recommended every 3 to 6 months, depending on your cooking habits and kitchen usage.
Can I use vinegar to clean all types of kitchen cabinets?
Vinegar mixed with warm water is safe for laminate and painted surfaces but should be avoided on raw or unfinished wood cabinets, as its acidity can damage the finish.
What is the best way to remove grease buildup on cabinets?
A mild solution of warm water with a few drops of dish soap works well for most grease. For stubborn spots, a baking soda paste gently scrubbed with a soft cloth or toothbrush can effectively break down grease without damaging surfaces.
Is it safe to use a magic eraser on painted cabinets?
Yes, but with caution. Test the magic eraser on a small, hidden area first to ensure it doesn’t dull or damage the paint. Avoid heavy scrubbing and never use it on wood cabinets.
How can I protect my cabinets from future grease and grime?
Use a range hood while cooking to reduce airborne grease and steam. Wipe spills immediately, avoid placing heat-producing appliances directly under cabinets, and perform regular cleaning and maintenance to keep cabinets looking their best.
Final Thoughts on How to Clean Kitchen Cabinets
Taking care of your kitchen cabinets is about more than just appearance. Clean cabinet surfaces protect your kitchen from bacteria, reduce allergens, and keep the heart of your home looking fresh and functional.
With a little dish soap, a soft cloth, and some regular maintenance, your cabinets can serve you beautifully for years. Remember, whether you’re wiping after cooking or performing a deep clean, the right tools and techniques make all the difference.
And if your cabinets are beyond saving, or you’re ready for a whole new look, our team at America’s Advantage Remodeling is here to help.
CONTACT US
Our Services
Areas We Serve
Certificate